DIY Marble Notebook Cake
Servings: 0
Ingredients
- FOR THE CAKE
- Nonstick cooking spray for the pan
- 1 box chocolate cake mix plus required ingredients
- 1 container Oreo cookies crushed
- 1 box vanilla pudding mix plus for required ingredients
- FOR BLACK FROSTING
- 1 stick unsalted butter at room temperature
- ½ cup cocoa powder
- 1 tablespoon vanilla extract
- 3 to 4 cups confectioners’ sugar
- ¼ to ½ cup milk
- Black gel food coloring
- FOR TOPPING
- White candy melts melted
- White fondant for decorating
- Colorful fondant for decorating (optional)
Instructions
- Preheat your oven as the cake mix directs. Spray a 9-by-13-inch baking pan with nonstick cooking spray; line the bottom with parchment paper and spray again.
- Make the cake: Prepare the cake mix as the label directs. Pour the batter into the prepared pan. Sprinkle with a few handfuls of crushed Oreo cookies and bake as the label directs. Let cool in the pan for about 5 minutes, then invert onto a cooling rack and let cool completely.
- Meanwhile, prepare the vanilla pudding as the label directs. Stir in crushed Oreos—as much or as little as you’d like!
- Once the cake is cool, transfer it to a cake plate or cake board. (You can cover a piece of a cardboard box or cereal box with plastic wrap in a pinch if you’d like!) Use the end of a wooden spoon to poke holes in the cake, stopping about 1-inch from the cake’s edges so that it maintains its shape.
- Spread vanilla pudding over the cake and into the holes. It’s okay if you don’t use all of it, save any extra for serving! For even whiter “marbling,” you can drizzle melted white candy melts into the holes before adding the pudding. Refrigerate at least 2 hours or as the pudding label directs.
- Meanwhile, make the frosting: Beat the butter, cocoa powder and vanilla with a mixer on medium speed until smooth and combined. Slowly alternate beating in the confectioners’ sugar and milk until you’ve reached your desired consistency. Beat in black gel food coloring—I used quite a few spoonfuls, don’t be shy!
- Scoop 1 or 2 big spoonfuls of frosting into a resealable plastic bag; set aside.
- Cover the entire cake with a thin coat of black frosting. Refrigerate the cake until the frosting hardens, about 30 minutes, this is your “crumb coat.” Cover the cake with another layer of frosting; chill about 10 more minutes.
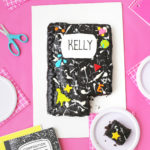
- Meanwhile, roll out white fondant and cut into a rectangle with rounded edges for the notebook label. Snip a small piece from the corner of the plastic bag with the black frosting in it and use the frosting to write a name.
- Use a spoon to drizzle, shake and flick the melted white candy melts over the cake to create a marbled effect. Don’t worry if you make any mistakes! You can refrigerate the cake until the white chocolate hardens, then just lift it off and start again.
- Place the notebook label on the cake. Snip a larger piece from the corner of the plastic bag and squiggle frosting along the left edge of the rectangle to look like the notebook’s spine.
- If you’d like, you can roll out other colorful fondant and use cookie cutters to cut out different “stickers” and shapes to decorate your notebook.
Tried this recipe?Mention @studiodiy or tag #studiodiy!