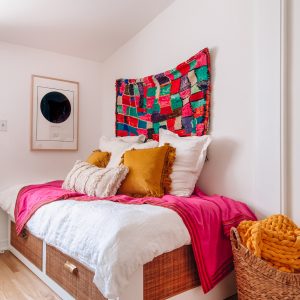
Easy Rattan IKEA Brimnes Bed Hack
Add rattan cane webbing to an IKEA Brimnes bed to give it character and texture!
Yield: 1 bed
Cost: $349
Equipment
- Scissors
- Hot Glue Gun
- Drill (for adding handles, if needed)
Materials
- 1 IKEA BRIMNES bed
- 2 MEISTERVIK mattresses
- 12 feet Raffia cloth
- 12 feet Cane webbing
- 28 feet Half round reed
- Gorilla glue hot glue sticks
- 2 Handles
Instructions
- I used Gorilla Glue hot glue sticks for this project for increased durability. To soften the stark contrast between the rattan and the white drawer, I added a layer of raffia cloth. This is optional. If you are adding grasscloth, remove the drawer from the daybed so you can access it better.
- Cut the grasscloth about 1/8-1/4" smaller than the size of the drawer front and hot glue it to the front along the perimeter and in the middle.
- Cut the cane webbing about 1/8" smaller than the size of the drawer front. Use the lines of the webbing as your guide!
- Carefully hot glue the webbing on top of the drawer and grasscloth (if using) around the perimeter of the drawer front, smoothing the webbing as you go so it lays flat. Let the glue dry completely (luckily hot glue dries very quickly!). If the cane is hanging off the edge of the drawer anywhere trim off with scissors.
- Trim your reeds to length with each end at a 45 degree angle so they fit together with a seamless corner. Hot glue each on. Ensure they do NOT hang over the edge of the drawer or the drawer will not close properly!
- Repeat with the second drawer and slide the drawers back into place in the bed. Add handles as desired!
- For the side panels, you'll repeat the same process except inside the panel instead of on top of the drawer front. If using grasscloth, cut it to size (approximately 1/8" smaller than the area) and hot glue on.
- Cut the cane webbing to size, about 1/8 smaller than the size of the panel, and hot glue it on along the perimeter only.
- Cut the reed to size, with each end at a 45 degree angle, and hot glue each on, starting with the top one.
- Match the corners as you glue the sides and bottom piece of reed on. Repeat with other side panel! Done.
Notes
Tips:
- Hot glue dries quickly, work in small sections as you go.
- To add new handles, I just drilled new holes in the drawer front, right through the can webbing, that fit the ones I wanted to add.
- Ensure the cane webbing doesn't extend over the drawer or the drawers won't close properly!
