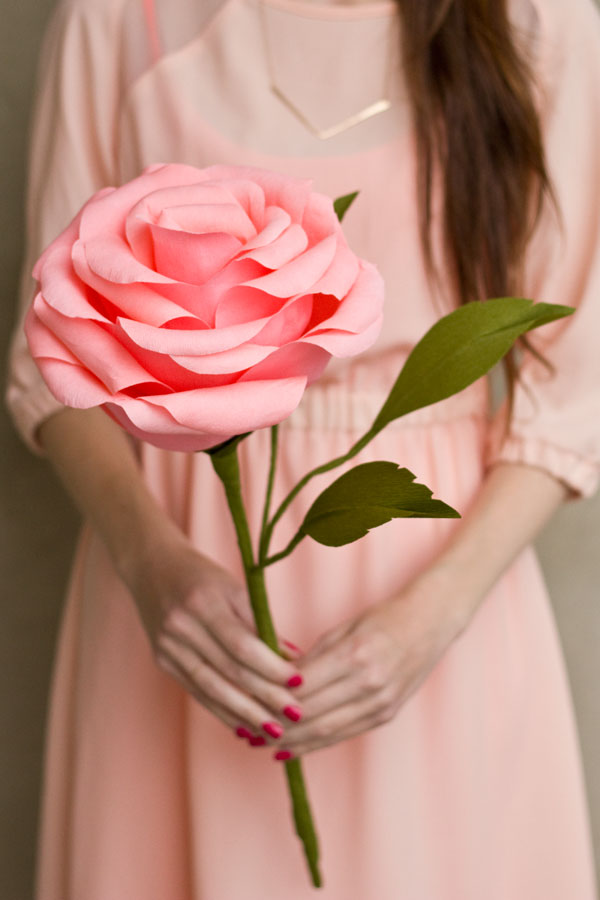
Happy Monday, folks! In case you didn’t notice last week, these giant crepe paper roses really stole my heart after I was asked to lead a workshop on them at a private Martha Stewart event last week. I’m hoping to share more on the class later this week, but for now I wanted to share my very own tutorial for making them! Of course, I am not the first to make these, but I did want to post a tutorial so I could share all the tips and tricks I learned along the way. This tutorial is very long and detailed, but if you do make these roses, you’ll thank me! They take about an hour to make when you first start out but are so very, very worth it. Everybody has gone crazy over them! They would make the perfect Mother’s Day gift so, quick! Order that crepe paper and get started!
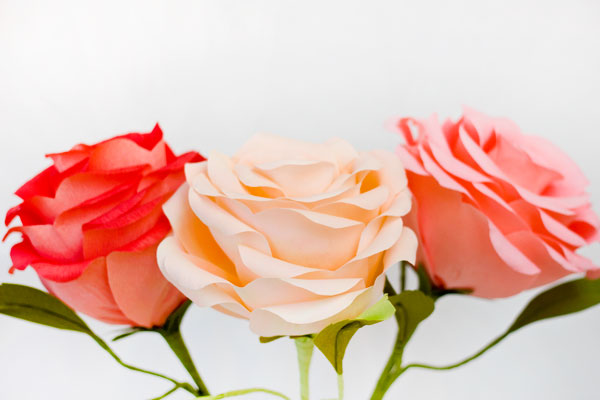
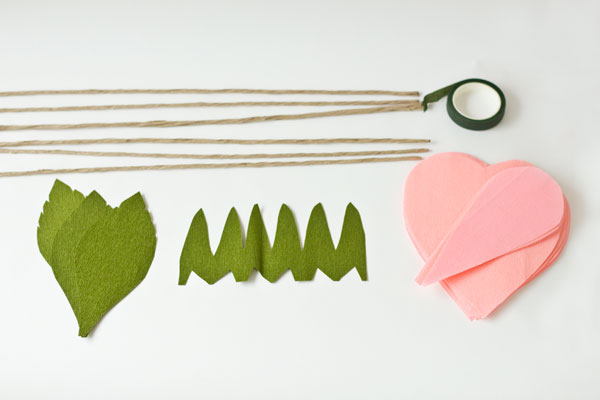
Doublette Crepe Paper (I used Light Pink, Light Apricot and Bubblegum (sold out, but Strawberry Pink is similar!) for my petals and the Pale Olive (sold out, but here’s a similar color) and Deep Olive for my leaves)
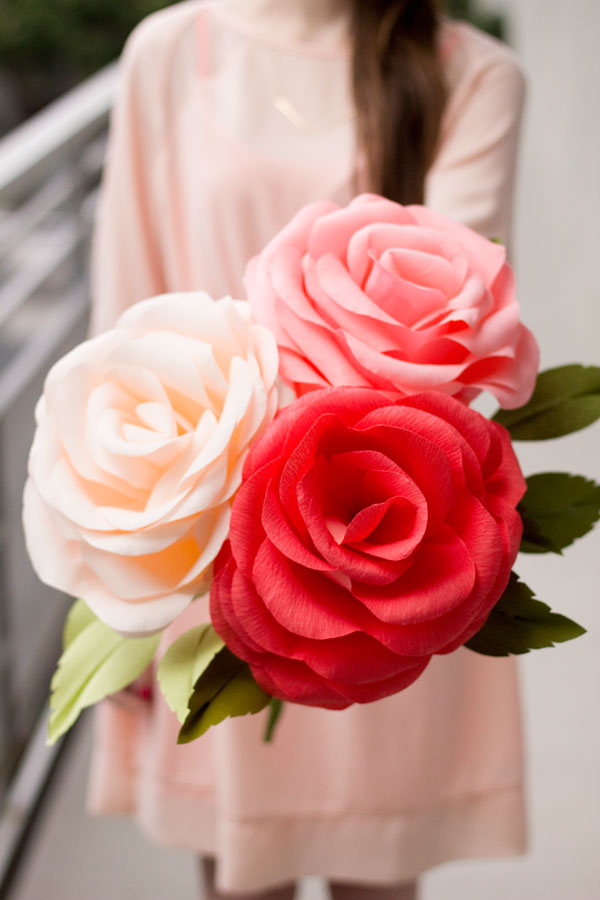
***I’ve had a lot of questions about what color the roses are. If you look at the photo above that shows the three roses, the one on the left is light pink. The color in real life is a salmon/coral color, though it showed up slightly more red in the photos. The one in the middle is light apricot. The one on the right is bubblegum. If you are looking for a true red, I’d recommend these colors. Hope this is helpful!!***
Templates (Download them here on Martha Stewart and enlarge to your desired size. They recommend enlarging to 200% but I went with 150% to make them a little smaller and more manageable. All measurements I discuss here will be for the 150% size)
Paper-wrapped Stem Wires (Six per flower)
Floral Tape
Craft Glue
Round Pencil
Cutting Out Your Crepe Paper
You will need:
5 Small Petals
15 Heart Shaped Petals
3 Leaves
1 Calyx
2 1″ Wide Crepe Paper Strips (Just cut the entire bottom off of one of your crepe paper sheets)
I recommend sacrificing a bit of paper and cutting several layers at a time (Believe me, it’s for your own sanity). I folded the crepe over and over again and stapled a template to the stack. Then I cut through all the layers that way, around the outlines of the shape. I found that I could get 8 heart shape petals out of each crepe sheet, 16 small petals per sheet, 17 leaves per sheet and 12 calyx (plural!?) per sheet. You can get 10 strips of crepe out of each sheet. You can also get a few additional small petals out of your leftovers from cutting the heart shape petals.
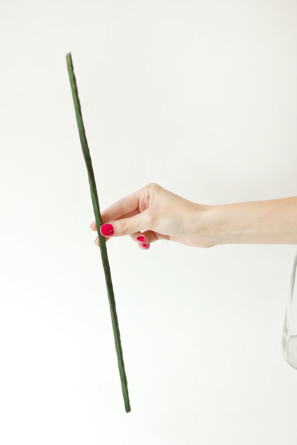
Begin by cutting everything out as listed above. Iron the petals, as necessary, to remove creases. Then make your stem. To do this, wrap three stem wires together with floral tape. It is important to stretch the floral tape as you wrap to activate the adhesive. Keep a damp towel near you to wipe your fingers as you go, they will get sticky.
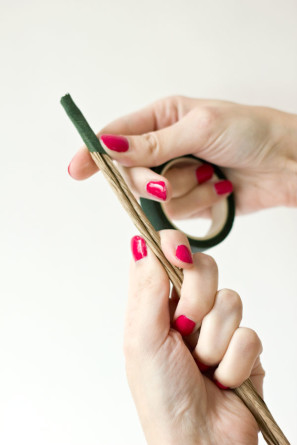
You’ll need to shape all of your petals. To shape the small petals, start in the middle of the petal and firmly but carefully pull the crepe outwards and upwards, forming a “cupping” shape in the center of the petal. Don’t be afraid to stretch the crepe! It can take it. Now you’ll need to curl the top edges of your petals. Do this by wrapping the top around a pencil, while stretching the crepe slightly to avoid wrinkles, about one to one and a half times.
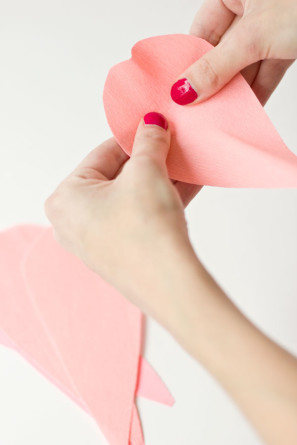
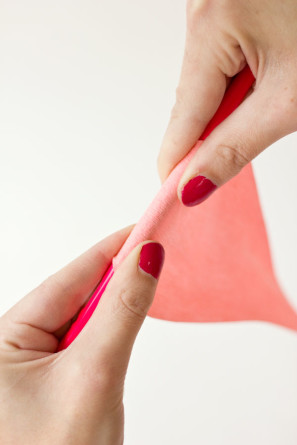
Do the same steps with the larger heart petals. Again, only stretch the center of the crepe, not the edges or the bottom. Curl each top-side of the heart as you did above.
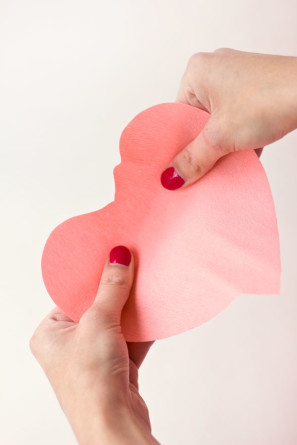
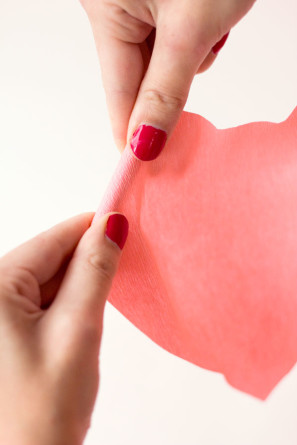
Voila! This is a tedious step but try your best to keep the shapes of your petals consistent.
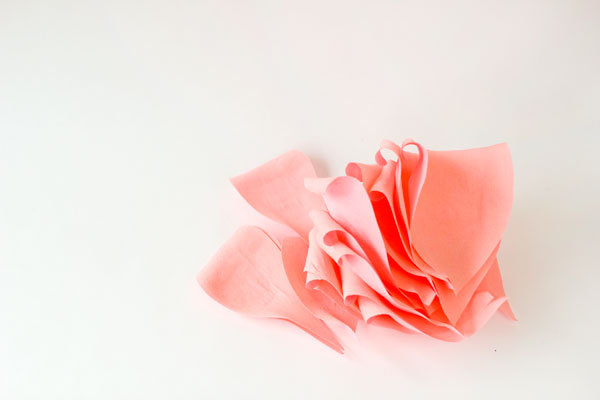
Now you’ll need to make your bud using your five small petals. Start by wrapping one petal tightly around the stem. Continue wrapping each petal around, rotating the stem each time, until you’ve used all five.
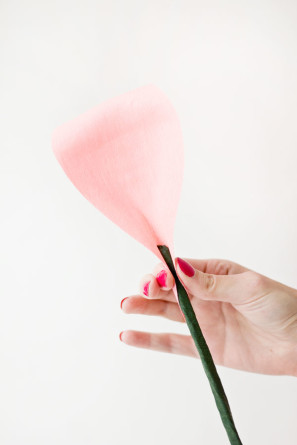
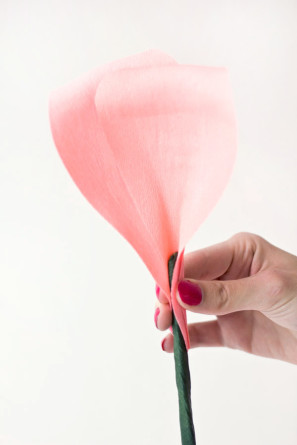
Your bud should look something like this. It is OK if your petals wrinkle, fold or bend slightly at the bottom. (Really! It is!) Now you’ll need to secure your petals with your floral tape. Wrap the tape all the way down the bottom of the petal until you hit the green of the stem again, this will secure the petals in place firmly.
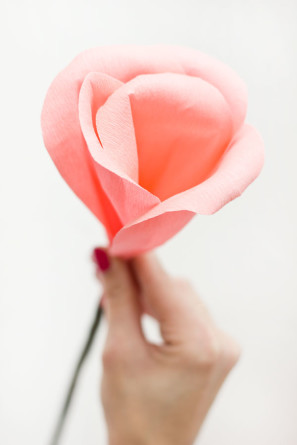
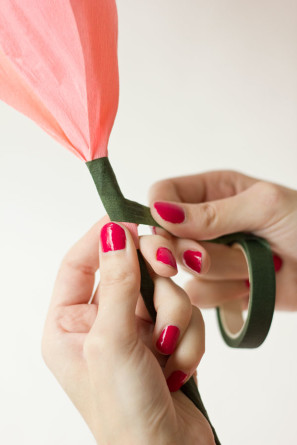
Now you’ll begin adding all 15 heart petals. Add as many petals at a time as you feel comfortable. I typically tape two petals at a time until I get to the last few, then I add one at a time. Each time you add a petal you should be rotating the rose slightly so the petals are spread around the rose evenly.
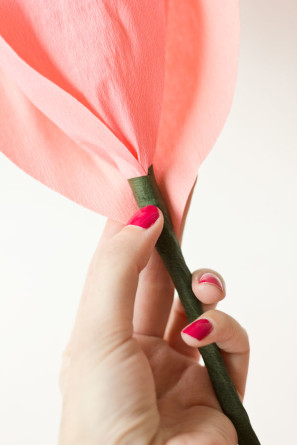
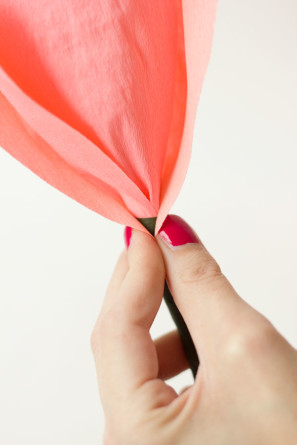
As your working, slip your fingers inside each petal and push the petal out to form it back to shape. After each petal, or few petals, use the floral tape to secure. Again, it is ok to have slight wrinkles and folds in the base of the petal where you are taping. Wrap the tape around and around until you hit the green of the stem again so it is secure! (This is so important.)
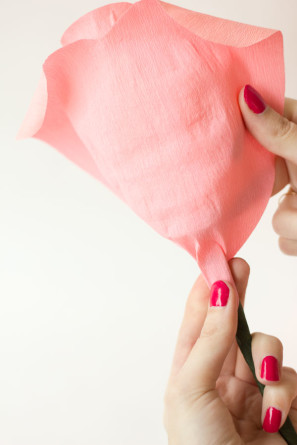
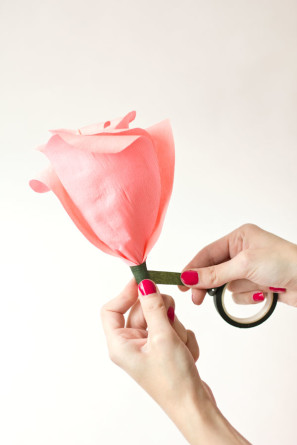
As you get to the last few petals, look at your flower from above so you can strategically place them where you think they are needed.
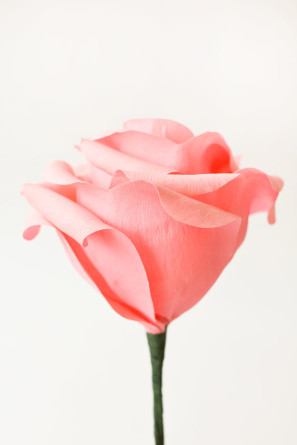
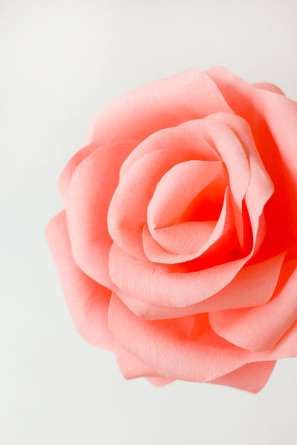
After all of your petals are secured, it’s time to add the calyx to the bottom of the rose. Flip your rose upside down to do this. Wrap your calyx piece around the stem. Fair warning: this step is awkward. It is only important for the large leaf-parts of the calyx to be flat and smooth along the flower. It is normal for the top of the calyx to NOT BE SMOOTH against the stem. (See Below) Starting on the stem wrap tape, continuing down over the calyx to secure.
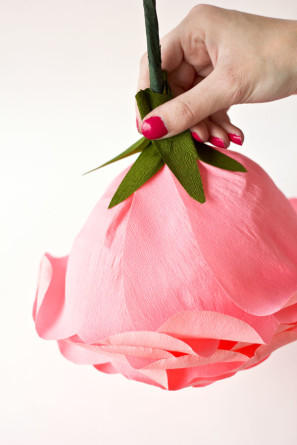
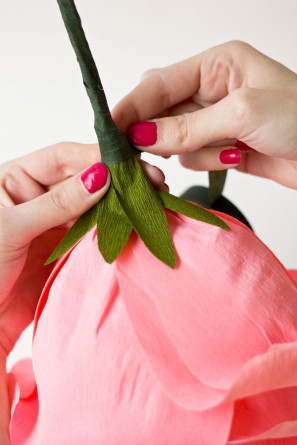
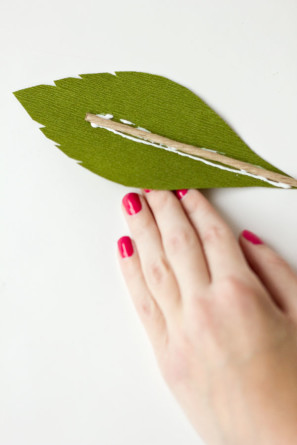
Set your roses aside to work on the leaves. Place a hefty amount of glue down the center of your leaf and lay a single stem wire in it. Fold your leaf over the stem and pinch and press along the stem to secure the two sides of the leaves together, covering the stem. Let dry.
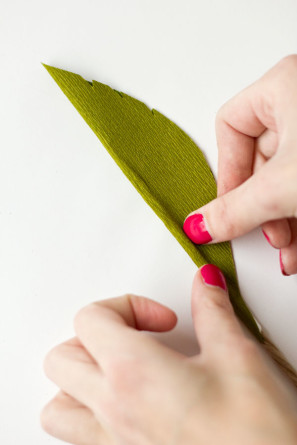
To “open” your leaves (once dry), I suggest holding on to the top of the stem on the back of the leaf and carefully bending it backwards. Now add a dot of glue to the base of your leaf to begin wrapping your stem in one of your matching crepe paper strips.
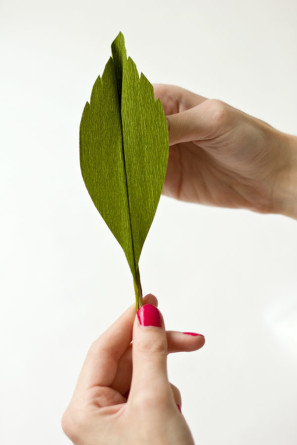
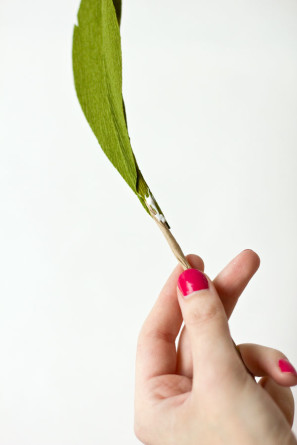
Wrap the crepe paper down the leaf stem just as you did with the tape on the flower’s stem. You only need a dot of glue at the top and bottom, nowhere in between! Wrap tightly in a diagonal motion, stretching the crepe as you go. Secure the end with glue. Repeat all these steps with two more leaves.
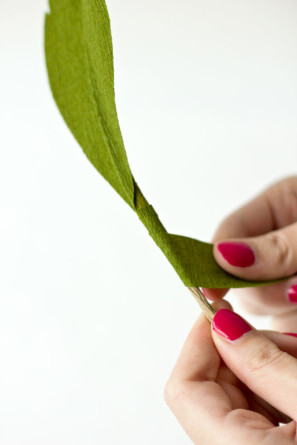
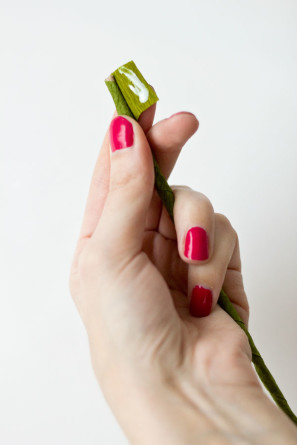
Now you’ll need to temporarily secure your leaves to the flower stem. Place your leaves around the stem as desired and tape, wrapping around just a few times, just below where you’re going to want your leaves to “bend.” You can place your leaves as far up or down on the flower’s stem as you want. Once they’re secured with tape, bend the leaves far outward so you have space to work. Place a dot of glue on your calyx and begin wrapping the stem with your second strip of crepe paper. It is a little tricky at first as you’ll get a bit caught up in the leaves. Just work slowly and be persistent, tightly wrapping as you go.
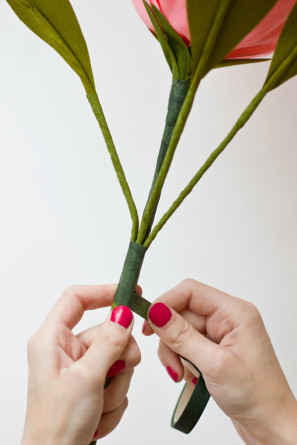
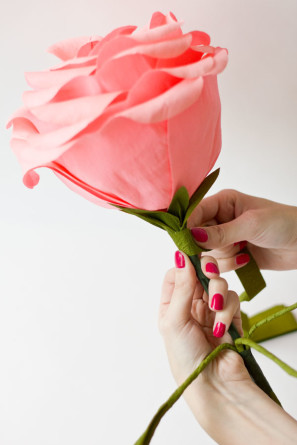
When you hit where your leaves are taped, simply continue wrapping the crepe paper but wrap over the leaf stems as well. Then wrap all the way down to the bottom of your stem and secure with glue. I placed my leaves up higher so my stems were not all even on the bottom. I though the crepe paper disguised this well enough and the unevenness at the bottom didn’t bother me. If it bother’s you, you can align all your stems at the bottom, but your leaves will be significantly farther away from the flower.
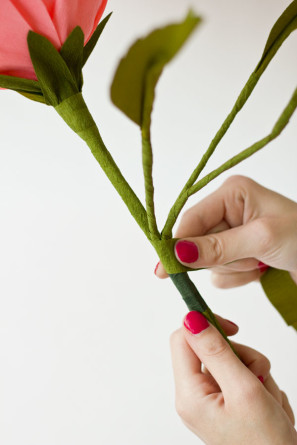
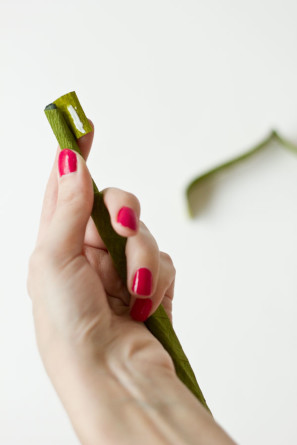
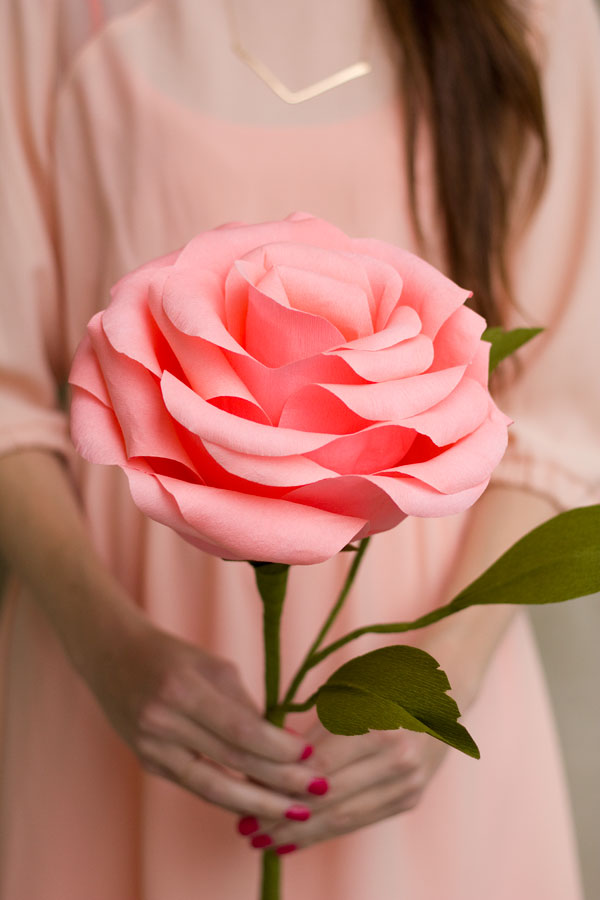
Bend all your leaves as desired and you are done!!!! I truly think this is one of my favorite crafts I’ve made. They are just so darn pretty!
Top Tips for Making Paper Roses
(In my opinion!)
1. Only shape the petals in the center! Leave the edges and the bottom points of the petal untouched.
2. Stretch the floral tape as you wrap. If you don’t, the adhesive won’t be activated and it won’t stick very well.
3. When attaching your petals always continue wrapping the tape down to (and on to) the stem. Allowing the tape to stick the stem keeps the petals from spinning around.
4. Don’t be afraid of wrinkles and folds in the bottom! The bottom of the rose is covered and it is ok for the petals to not form perfectly around the stem at their base. Seriously, this was my biggest obstacle and I almost drove myself nuts trying to make them perfect and smooth.
5. Always re-shape your petals as you work. Slip your fingers into the petal and re-“cup” it so it lays close to the previous petal. This will create a tight and secure rose.
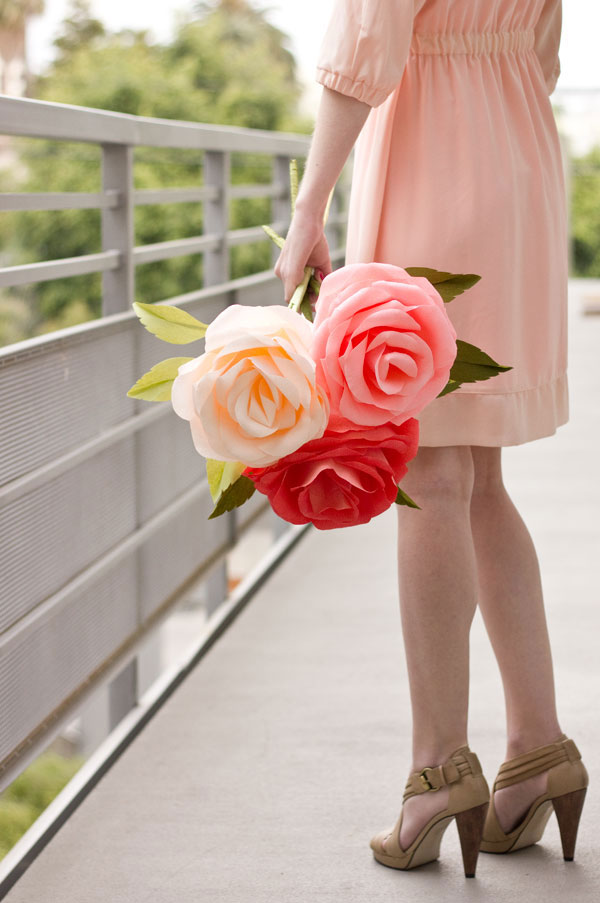
All Photos by Studio DIY
Phew! Are you still with me!? This was one hefty post but I know I would have appreciated these tips when I was first learning to make these. For your reference, there’s also a video tutorial from Martha right here. My way of making these roses may be a bit different than this or others, so if you’ve made them before, feel free to share your own tips and tricks too! My favorite part about this project is each and every rose is different! They have so much personality and make amazing gifts, bridal shower decor, and just a fun touch to your every day life! I sure hope you’ll try your hand at one!


icing designs says
so absolutely gorgeous!!! we have to try and make these! what a statement!
Brittni says
Yay. These turned out so great Kelly! I know they were a lot of work, but they look so good.
Jolleen says
These are beautiful! Great for a styled photo shoot. I can’t wait to try these at my next party!
xoxo
Jolleen
http://simplyjolleen.com/
Regina says
Hi Kelly, I was at the event. You were a terrific teacher and I absolutely love how my rose turned out. Thank you for posting the instructions here so I can make more of them!
Kelly says
Thanks Regina!! I’m so glad you enjoyed the event!! Will keep you posted on future craft events as promised! =)
Kelly
Amanda says
these are stunning! i would love to make these for my bridal shower, but i’m pretty intimidated… I bet once you make one though, the rest are easier.
Kelly says
You can TOTALLY do it! Also, you’re right, once you make one they go a lot faster from there! You should definitely make them!
Kelly
bats says
Hey,
these are STUNNING! I mean, I am hopelessly in love with them. Unfortunately, we don’t get double sided crepe in my country – atleast i’ve never seen it. Will these roses be as pretty if i make them with single color crepe or should i take two different colour sheets and glue them together?
Another question, i don’t know if i’ll find paper wrapped wire – i might find just the wire at a flower shop. Do you think i could just use old newspaper to wrap the wires myself? Also, what can i use in place of garden tape. We definitely don’t get that here.
Thanks!
Kelly says
Thanks!! You could use a single color of heavy weight crepe, however the texture is slightly different so they may not look exactly the same. For the wire, it definitely doesn’t need to be paper wrapped at all. Just use any floral stem wire you can find and wrap it in the tape just like in the instructions.
I would ask a local florist if they will give you some floral tape. I imagine they would have it in most countries. Otherwise, there are plenty of places online to buy, that I imagine would ship to you. Amazon is one of them!
Hope that helps!
Kelly
brittney phelps says
the girl in the picture holding the completed rose has the cutest dress. Where did she get it? It is just what I need for a wedding I am in.
Kelly says
Thanks Brittney! =) I got the dress at Target back I’m January. Not sure of they still have it, but worth a try! Hope you can find it.
Kelly
Béatrice Chadwick says
j’aime beaucoup tes roses. Ma fille se marie en septembre prochain alors j’ai le temps d’en faire plusieurs pour la décoration de la salle. Merci de nous donner ces informations, c’est très bien expliqué.
Sharonkay says
How many crepe paper sheets are needed for each rose??
Kelly says
Depending on how you cut them, you’ll need two to three sheets of your petal-color paper and one sheet of your green paper for each rose!
Kelly
Amanda (Lovey Dovey) says
Thank you so much for the B.E.A.U.T.I.F.U.L DIY!!!! I shared with my readers and I think any lovely lady would appreciate these!
Kelly says
Thanks so much for sharing with your readers, Amanda! How could anyone not love giant paper flowers, right!? 😉
Kelly
wrinkle cream says
This is very interesting, You are a very skilled blogger.
I’ve joined your rss feed and look forward to seeking more of your fantastic post. Also, I’ve shared your
site in my social networks!
Kiersten Weir says
I just made my dirst flower for my wedding! I was curious about the ironing process because I didn’t iron mine but I like the smooth appearance better. Do you iron the paper with a regular iron? How hot? And do you leave the crepe unstretched to iron it so it doesn’t lose it’s stretching ability? Thanks!
Kelly says
Oh my goodness, these would be so gorgeous for a wedding!! You must send me photos, I would just love to see it! =) For the ironing, I used a regular iron on a medium setting and I did iron right over the paper. If that makes you uncomfortable, you can use a thin cloth (like a tea towel) overtop of the crepe paper while ironing. I’m sure each iron is different, so test it out on a scrap piece first! Definitely iron before you stretch the crepe. I cut out all my petals, then ironed, then started stretching.
Hope that helps!!
Kelly
Kiersten Weir says
Thanks for the advice! We are doing red white and blue theme for 4th of July and we really wanted it to stand out but be affordable. I actually bought ROLLS of crepe paper from papermart.com. It’s way cheaper and each roll makes about 1.5 flowers worth of heart shaped petals, so order a little extra for the tear drop petals (if enlarged to 200%). I will upload pics when I’m finished! Thanks again!
Kelly says
How fun! The rolls of crepe are definitely more cost effective. Can’t wait to see photos! =)
Kelly
Mal Freeman says
I made a small trial one and found it easier to lay about 3 petals at a time onto some double sided tape, put them in place, then took the backing off, this then became the adherent for the next round. It saved the petals slipping out of place. Now to make the larger ones ready for my future daughter in law to carry at her wedding to my son next year.
Kelly says
That sounds like a great idea, Mal! So glad to hear you’ll be using them for your son’s wedding (And congratulations!). I would love to see photos of the flowers in action! =)
Kelly
PJ says
Thanks for the detailed tutorial. I’ve recently tried to make one, but the petals dont seem to hold up well when the stem is in an upright position. Should I have taped the floral tape up higher when attaching them? I taped the petals about 2.5 inches from the bottom of the petal downwards. Thanks!!
Kelly says
Hi PJ! Sorry to hear you’re having issues with the petals staying, they are definitely tricky! You definitely want to make sure you are taping about 1.5-2.5 inches of the bottom of the petal when you’re attaching it, which it sounds like you are doing. The most important thing though is that you continue taping each petal past the bottom of the petal and onto the stem for another inch or so. This allows the new tape to adhere to the tape already on the stem and really holds the petal in place. I hope that helps!
Kelly
filiz says
amazing 🙂 i did smaller than this , looks beautiful . thanks for sharing
Donna Soliva says
loving this! 🙂 will post this to my blog and share to the world! 🙂 thanks for sharing 🙂
Jenn says
So gorgeous! I love these! Thank you!
Julia Hartlieb says
Completely unrelated to gorg-rose question – where did you get that nailpolish?
Kelly says
It’s OPI “You’re a Pisa Work”! Such a fun color, right!?
Kelly
AJ says
Hi Kelly,
Ill be making these flowers for my wedding centerpieces and Bridesmaids. I wanted to ask if there was anything special about the Doublette Crepe Paper in comparison to other places that sell it? I also wanted to ask if these flowers have been done smaller and more relative to a natural size rose? I want to do smaller roses for the centerpieces and the ginormous ones for my bridesmaids. Do you think one flower per bridesmaid at this size is adequate or should I do bunches of three (same size) like you have in the photos? Last question I promise (lol) My colors are Red and Ivory. Mostly and all ivory wedding with red accents. How can I incorporate these different colors into the flowers?
All help and advice is much appreciated. You did an AWESOME job with these flowers and I’m so excited to see how mine turn out… especially since I’m doing different sizes.
Kelly says
Hi AJ!
How exciting!! The doublette crepe paper is a little bit different than regular heavy weight crepe paper. It is double sided, so there are two different colors, which gives great “depth” to the rose petals. But other than that, the texture is slightly different, the doublette has a “finer” crepe/texture, if that makes any sense. Both regular crepe paper and doublette can definitely be used (I’ve made them with both), but I personally preferred how the ones with the doublette turned out.
I think one rose in the size I made (150%) or in the 200% size (slightly larger) would be good per bridesmaid. I think three would be overwhelming. (Plus, less work for you that way!) You could certainly make these smaller, though I’ve never tried it myself. However, the smaller you make the roses, the more difficult it is to put it together. If you do make them smaller, be sure and only use ONE of the wire stems per flower, not three, as it will be hard to “wrap” the small petals around three.
If you go with the doublette crepe, it looks like the red/brick red option would be your best bet, unfortunately they don’t have an ivory color. But that would definitely accomplish your pop of red!
Hope that helps! Feel free to email me (hello{at}studiodiy{dot}com) with any other questions, and please do send photos of the finished roses! Happy Crafting!
Kelly
Kiersten Weir says
I made one rose per bridesmaid (200%) for my wedding and they were amazing! Great photos too. I carried three smaller ones. Kelly, what is the email address I can send a photo to? They turned out great!
Dianne Rigsby says
Approximate cost to make roses, love them! They don’t have to be huge, something for perhas a vase? Wuld that work, not 200 or 150 can you go smaller? I use to make wreaths for front doos, Spring, Summer, Christmas, etc. But stopped for awhile, I lived @ Michaels Craft Store. I enjoyed doing crafts, relaxing an being creative @same time. Thank You
Donne Roma says
Great! Thanks for sharing!
Shoba Shrinivasan says
So so so pretty!!! I really loved these roses.
Shobha
Julia Bleu says
we are doing a ‘Queen of Hearts’ shower for my niece and making these out of white butcher paper (that you can purchase by the roll) on white painted tree branches in three sizes: One without enlarging, one at 150% and the other at 200%. Some of the petals I have taken and literally wadded up them up, then straightened out before rolling the edges on a pencil and subsequently used smaller diameter rolling tools for the smallest rose (ie: chop stick). And the others i have done with just the straight paper. It’s a little bit more creative challenging since it is not crepe paper and thus does not have that stretching or cupping ability as easily but it does work! They look absolutely fabulous especially with being all white just like the poor Rabbits in the Queens garden who had planted the wrong coloured roses instead of red 😉
Kelly says
Hi Julia! It’s great to hear that this tutorial can be adapted for regular paper. Sounds like it’s going to be a beautiful shower. Would love to see a photo if you have one!
Kelly
Katie says
I’ve been following this DIY and made a couple of flowers using the single, heavyweight floral crepe paper and some regular floral tape sold at a popular craft chain store. I made one that was not enlarged and one that was 150%. They were both a pain in the butt! They look pretty, but I don’t think my patience can handle any more dealing with floral tape. Which brand do you use? Whichever brands I’ve tried out just get me incredibly frustrated. I know that I’m doing the floral tape correctly (stretch, apply, smooth, repeat), but I think I’m just getting cheap floral tape, but I don’t know which kind to buy online. Thanks for the tutorial!
Kelly says
Floral tape is definitely tricky and a bit frustrating, and these flowers are definitely time consuming! I used this floral tape
and thought it worked really well. Wasn’t as overly-sticky as the other ones I used, and that’s what I preferred.
I really hope that helps!!! Keep me posted!
Kelly
Jacqui says
Hi,
I was wondering where you got your dress shown in the picture? I love it!
Kelly says
Hi Jacqui! Thanks! I got it at Target last spring, not sure if they’ll still have it but it’s one of my faves!!
Kelly
Kaylee ford says
I was wondering why ur darker color looks reddish/pink and on the crepe paper website it’s called bubblegum and it looks soooo similar to the cream pink middle color? Just making sure it was the right colors or if your pictures were true to the color or edited? I just LOVE the colors and look u did in the pic and want to recreate them for my wedding?
Kelly says
Hi Kaylee! Good question. So, the “cream pink” is actually the darkest one I used. It has a deep salmon color on one side, so it’s definitely less red in real life. The “bubblegum” is the medium-hued pink you see and the “pink apricot” is the very pale one. If you’re looking for something more red, you may want to dry the “dusty rose” combo as that has one side that is a true red. What I’d suggest is calling up Castle in the Air and chatting with them. They are super helpful and will be able to get you the right colors for your wedding! Happy crafting!!!!
Kelly
Kaylee ford says
Thank you soo much!! Your awesome!
Bea says
I absolutely loved this!
Bridgette says
I was wondering where double sided crepe paper can be found or if there is an alternative? Thanks girl! 🙂
Emma conover says
Hello, I just wanted to share a great website that carries the double sided and regular crepe paper sheets. It’s called Rose Mille, their website is rosemille.com. They have a lot of unusual craft items too.
I absolutely LOVE your blog.
amy says
Hi,
I am thinking of making this with regular crepe paper. do you have a photo of your flower made from regular crepe? I’m trying to cut down on costs, which is why i wanted to do the reg. paper than the doublet
madison says
that looks gorgeous ♡
katie says
hi kelly! i was wondering on the steps showing how to make the rose was that color the bubblegum? because im making it for my mother on valentines day
Kelly says
Yes! That’s the bubblegum in the step-by-step photos!
Trish Rush says
I cant get the paper to stay curled!! It curls for 10 mins or so and shrinks back down!
Kelly says
Hi Trish! Make sure you are really curling it around the pencil a few times so that it gives a good curl. If you do that, it should stay put!
Hope that helps!
Kelly
Cindy says
Hi! I would like to know if i can buy one or a couple of flowers! I’m from quėbec, canada ! Thank you!
Zoe says
Such wonderful photos and instructions.
Where online would you suggest purchasing papers and other materials from?
jonh says
wow it is really nice Crepe Paper Roses thank u for sharing
Megan says
Hi kelly,
I wanted to make some of these for my upcoming wedding as fun props for photos but I’m not sure how much doublette crepe paper I need to order. I want to make sure I’m reading/understanding your directions correctly. To make 1 flower do I need 3 full pieces of crepe paper to obtain the 15 large heart shaped petals and 5 smaller petals? Thank you!
Ed says
Hi, I just have a quick question. I want to make these for my girlfriend and i was wondering how many crepe papers i would need for one flower. I bought 2 crepe papers for each color of the rose and 2 olive green paper. Would 2 crepe paper make 15 heart shaped petals and 5 small ones? Thank you very much!
susana says
Hello my name is susana and I publish on my blog crafts. The truth I liked the flower and I wanted to ask you if I can post it on my blog I give you your publication credits. Published it in Spanish because I am Mexican I hope your answer greetings
Kelly says
Hi Susana,
You are welcome to share a single photo from the post on your blog, but I can’t allow you to re-post the directions, even if they are translated. Thanks for the interest, though!
Kelly
Crys says
I love those flowers and will be trying them out for my daughters rooms.
I know this is so off topic but those shoes. Oh how I love them. Where did you get them?
Kelly says
Thanks!! They are about 6 years old, but they are from French Connection I believe!
Lis says
Absolutely gorgeous! I can’t wait to try making these flowers. They would make amazing center pieces.
kafia naaz says
awesome..m so very much desperate and keen to.learn all this but for some reason m not finding the rite stuffs n for some I don’t know the rite names..still trying mah best…ur instructions were awesome n helpful for beginners like me..thank u so very much..
alicia says
Hi! I am having trouble figuring out to enlarge your templates. I know this should probably be the least of my problems. I copied it to word and enlarged to 200%, but i can not figure out how to get each shape on one piece of paper.
Bhagy says
What is the gauge size of these stem wires you used?
WENDY says
I was pretty horrified when I went to a wedding recently and the bridesmaids were carrying these. They made a crunchy sound and it was just ridiculous looking. Please explain why they are ‘all the rage’
Jamie says
hi! seriously LOVE this post and just ordered all of the materials to make these for girl friends on valentine’s day. I noticed your small petal and heart shape in the close-up tutorial do not look like the same shapes on the template provided… will this effect the outcome of the flower?? i’m really hoping they will look exactly like they do in the photos, so i’m wondering if I should alter the template to be more like your close-up photos (small petal – slightly heart shaped, and big heart more of a wavy heart) or will the template produce the same looking flowers? thank you in advance!! xxo
Dragua says
I’m looking in to if I can make them somehow out of silk. What were the size of the finished rose petals? Basically the square inches. That way I can plan. I am on a limited budget so I have to plan a lot.
Kelly says
Awesome! Love this so much.
milly says
how do you enlarge the template when printing? pls reply asap!!!!!!!! step by step
Maura says
I cannot get the templates from Martha Stewart website. Where else are they available. I LOVE you roses – perfect for daughter’s coming wedding ! ! ! THANKS ! Maura
Jess says
This tutorial is SO helpful compared to some of them out there for the same project. I have successfully made two roses and plan to make a bunch more for all of my wedding party! It’s a beautiful alternative to real flowers, much less expensive, and a personal DIY touch! Thank you for taking the time to make this detailed tutorial, Kelly!
Nimisha says
Hi,
those flowers are really wonderful. But I thought of making them with the usual crepe paper since I could not find the doublette one. And I cannot order them online here for some reason.
If you don’t mind, can you please tell me what are the extra things or steps we need to do to make with the normal crepe paper???
Thank you.
Ruth says
Hi, I love these roses, and am having a go at making them out of Eva foam. Just wanted to ask ; when you are putting them together, are you adding each petal a little lower than the previous one?
bobblehead sale says
Very very beautiful, from the flowers to the gown to the table settings !
Misako Yamazaki says
Hey there! This tutorial is amazing! I was wondering, though: could I use book pages for this? Do you think I’d get the same results? I imagine book pages would be just a bit thicker than crepe paper.
FATIMA says
WHAT AN AMAZING FLOWERS YOU DID!! I WANT TO KNOW WERE DID YOU BUY THE DOUBLETTE CREPE PAPER?
sounthariya says
awesome yaar. actually i’m a great freak of roses thanks for ur instructions. this is really really awesome i’m a college girl and i’m gonna try this at my symposium.
Kate says
This is so pretty!
Kate | TheOrganizedDream.com
Kim says
I love the flowers. I decided to make some for my daughters wedding.. It took a very long time to make one. FYI… Get good floral tape. Don’t use dollar store grade. I had to get glue gun out to finish cause as it gets larger around stem it wasn’t holding. I made leafs from green burlap.my mind m used wonder under to put 2 sides together. It’s beautiful and my daughter loves it
Bernadette says
I LOVE these roses! I do all sorts of crafts but never this. Where do I get the crepe paper from? I have the pattern already. Took the small template I got on line and blew it up to 200% I can’t wait to get started!
Sandy Fox says
Where do you get the large sheets of crepe paper?
Jody Shirley says
Hi, I was curious about how you would store these after you make for an event. It would be a shame to ruin them while saving for another use.
Jaime says
Thank you for such a lovely instructional project. Was looking for the best way to do this. A lot of the ones I found were okay but this one looks way more detailed and real. 🙂
Ram says
please tell me your name rose was very beoutyful
brabusday says
thank you very much this helps me best regards
Dearlives says
So lovely. Con’t wait to try making a diy paper rose for my sister. Thanks for the inspiration.
Julie says
these are simply gorgeous
A'miya says
WOW!!!!!!!!!!