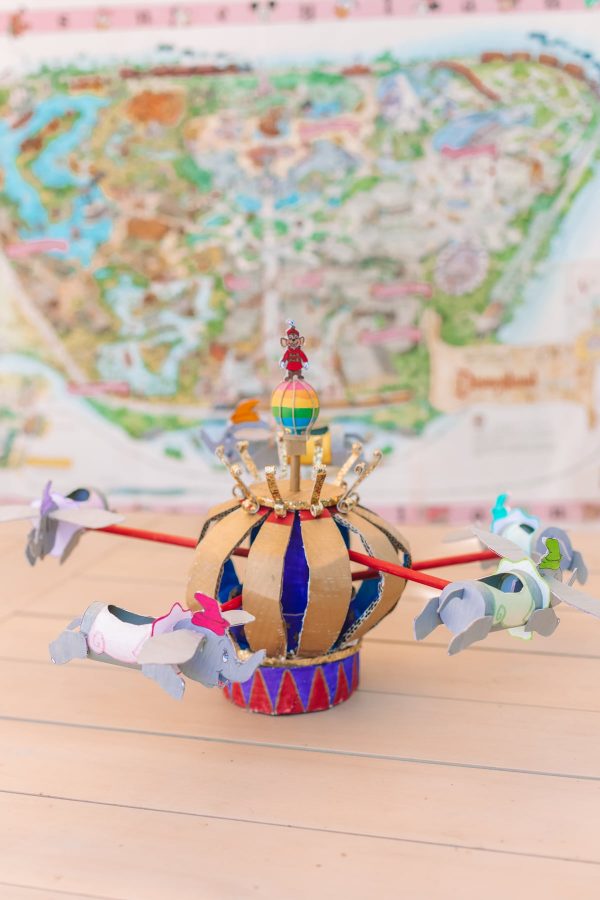
I hope this is the first of many cardboard Disneyland creations! Well, technically it’s the second as I already made a cardboard Sleeping Beauty castle (will share the tutorial soon!) and I already have so many more ideas!
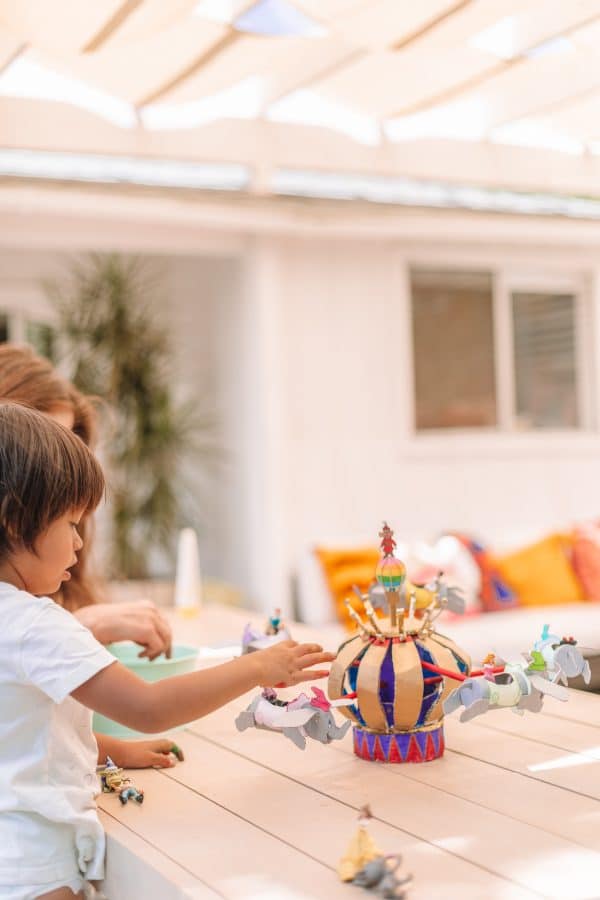
But for today, let’s learn how to make a cardboard Dumbo ride!!! And it actually SPINS too! We have been having a lot of fun using it with our Disney figurines. This is a project that has quite a few steps, but nearly all of it can be made with recycled cardboard and spare parts you probably already have in a toolbox somewhere!
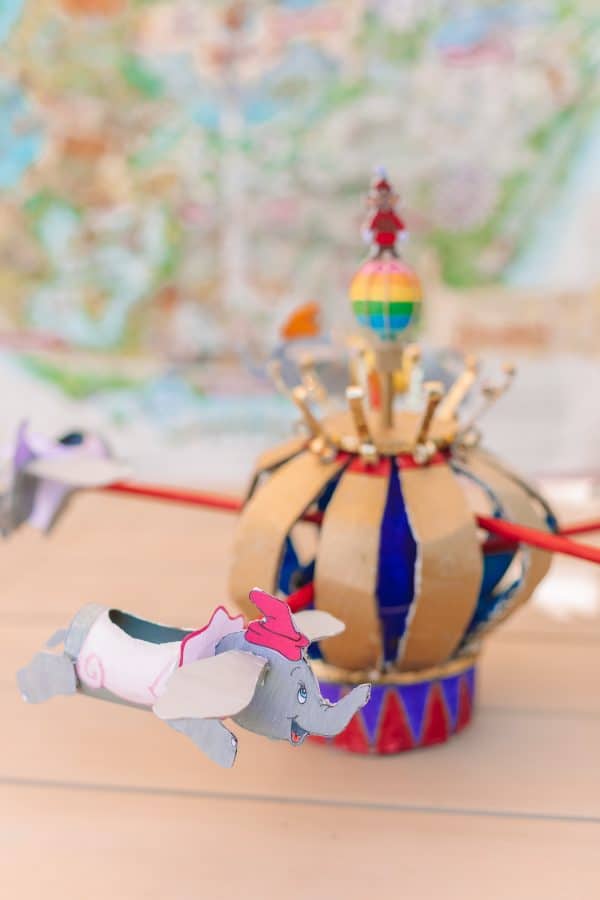
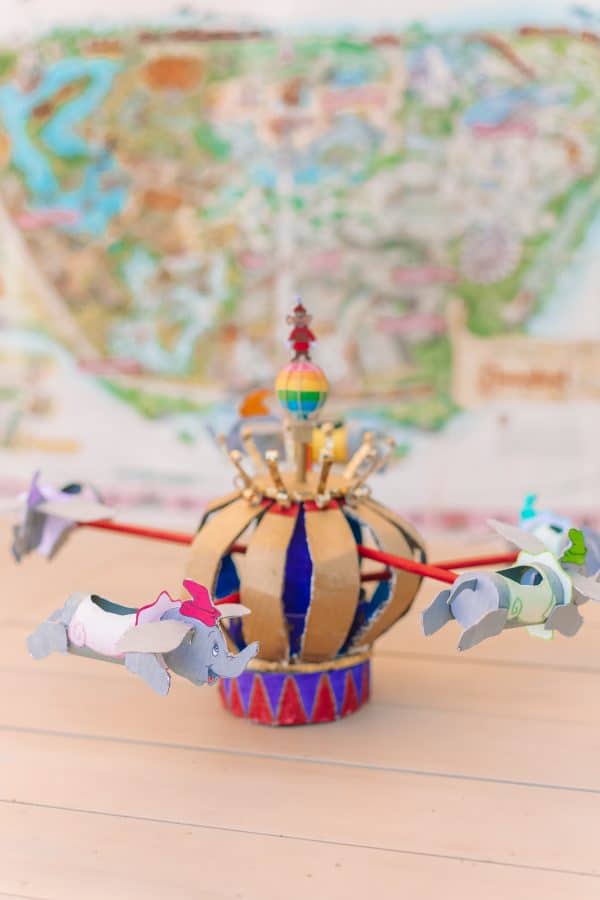
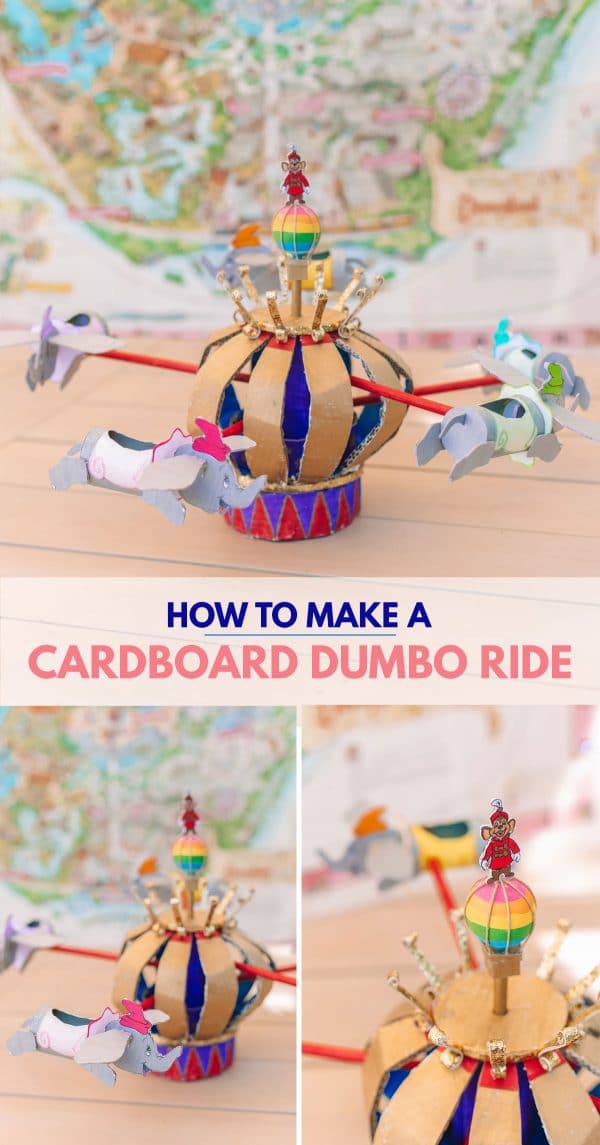
If you’re a Disney fanatic, you know that the Dumbo ride has taken on a few different looks. I tried to model this off of the most recent update to the Disneyland version.
I love all the gold and that rainbow balloon at the top! But feel free to adapt this to your favorite version, whether that’s past, present, Disneyland or Disney World! Here we go!
Supplies For Making Your Dumbo Ride
- Corrugated cardboard (Shipping boxes, etc.)
- Thin cardboard (Cereal box, etc.)
- Five Cardboard Tubes (Toilet Paper Rolls, etc.)
- Cardstock
- 1 bolt, 3 washers, 3 nuts
- Six dowels (Mine were 3/8″ wide x 12″)
- One 1 1/2″ wood sphere or bead
- Paint or paint markers in:
- Red
- Blue
- Gold
- White
- Gray
- Varying pastel colors
- Markers in:
- Black
- Varying colors, slightly brighter versions of each pastel paint
- Colored pencils in matching pastel colors
- Pencil
- Twine
- Hot glue gun
- Scissors
- Gold glitter foam sheet (Unnecessary, but I had some so used it to make some of the final details! You could use cardboard again!)
How To Make the Cardboard Dumbo Ride
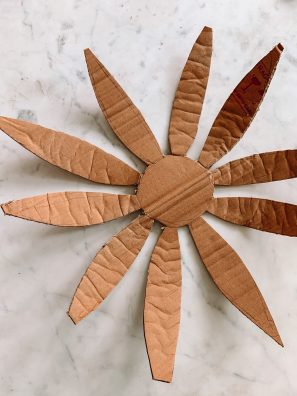
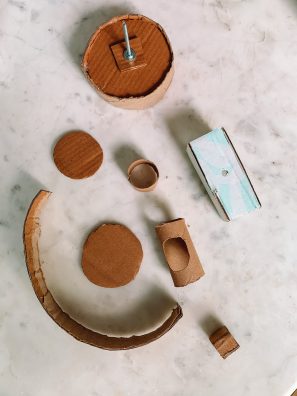
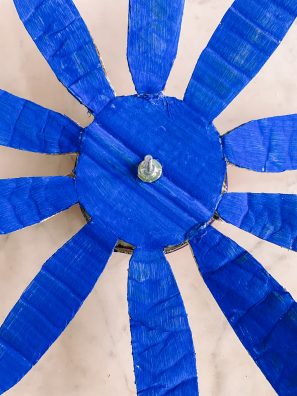
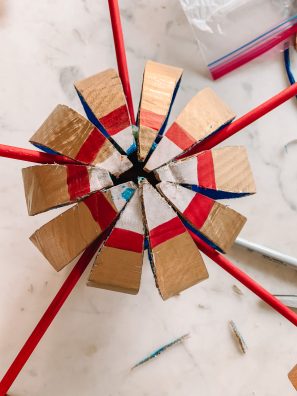
Cut a cardboard circle, about 18″ in diameter. Draw a smaller (approx 3″ diameter) circle in the center of this larger circle. Then cut ten narrow, “petal” shaped sections into your larger circle, as shown in the photos above.
Cut the following out of cardboard:
- Two 4″ circles
- One 3″ circle
- One 1 1/2″ x 15″ strip
- One 1 1/2″ x 14″ strip
- One 2″ square
- One 4 1/2″ x 8″ rectangle
- Five toilet paper rolls, with an oval cut into the top of each (set aside and save for making the Dumbo vehicles below!)
Assemble the cardboard pieces as follows:
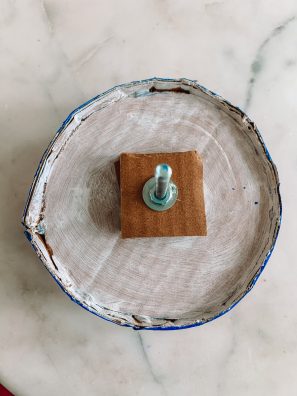
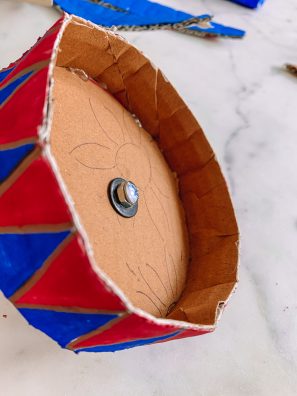
- Poke a hole through the center of one 4″ circle and the 2″ square. Stack the square on top of the circle. Slip a nut and washer onto your bolt, then slide the bolt through the two cardboard pieces. Add another washer and nut to the top. Tighten the nut and then HOT GLUE it in place (otherwise the nut/bolt will come unscrewed as it spins). Glue the 15″ strip along the edge of the circle. This becomes your base.
- Fold the 4 1/2″ x 8″ rectangle into a 3D column shape, lengthwise, with each long side being 2″ wide. Hot glue.
Paint the various pieces as follows:
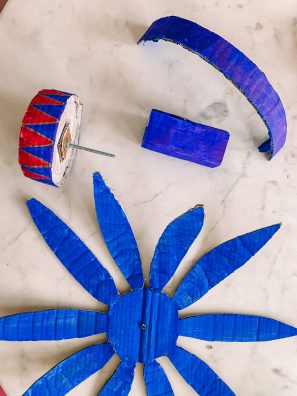
- The large “flower” looking shape should be painted blue on one side (the “inside”) and gold on the other (the “outside”). You’ll want to add a white and red stripe to the tips of each “petal” on the gold side as well. See photos!
- Paint the outside of the base with a blue and red triangle pattern, outlined with gold.
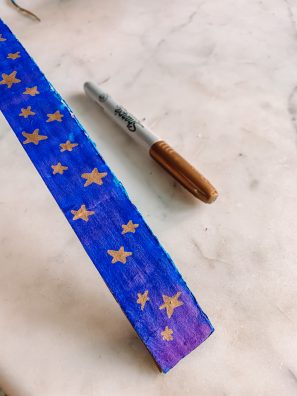
- Paint the 14″ strip blue and add gold stars.
- Paint the column blue.
- Paint the other 4″ circle and the 3″ circle gold.
- Paint five dowels red.
Tip: I found that using paint markers was way easier on a lot of this than painting freehand, but either works!
Poke a hole through the center of the “flower” shape. Slide onto the bolt. Add a washer and nut. Tighten, but ensure the flower can spin fully and easily around the bolt. Hot glue in place.
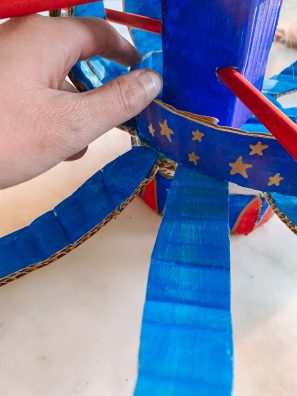
Hot glue the column in the center of the flower shape, hiding the bolt inside of it. Then, hot glue the 14″ blue strip around the edge of the circle in the center of the flower shape.
Trim red dowels down if desired. I trimmed about 2″ off of each dowel, but you can decide if you want to leave them longer (making the Dumbo vehicles further from the ride) or make them even shorter (so they are closer to the ride).
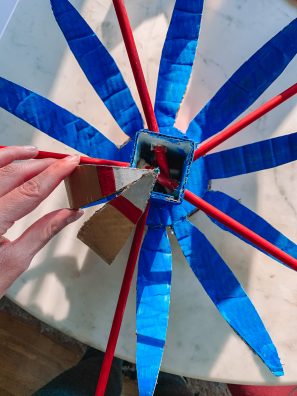
Insert the dowels into the column. To do this, you’re going to need to do some trial and error. You need to fit five dowels evenly spaced around the column. Additionally, each dowel needs to be placed so that it occupies a “space” in-between two petals, once they are folded up to become a sphere shape. See photos.
Tips: To do this, I suggest holding up a dowel where you want to put it, and folding up the petals surrounding it to ensure it fits properly. Once you’ve done that, use scissors to poke a hole through the column where you want to insert the dowel. Put a large dot of hot glue on the END of the dowel and slide it through the hole until it touches the other side of the column where the glue will adhere. You’ll want each dowel to be placed at a slightly different height, to give the look of the Dumbo vehicles moving at different levels.
Fold up each petal shape and hot glue to the top of the column. They should be curved (use your fingers to help curve the cardboard) and form a sphere shape.
How To Make The Dumbo Ride “Vehicles”
All of the instructions below are for ONE Dumbo ride “vehicle.” So multiply the quantities by the total number of vehicles you make. For my ride, I made five vehicles total.
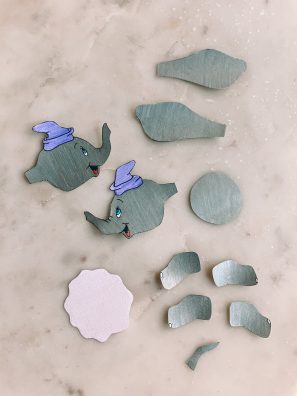
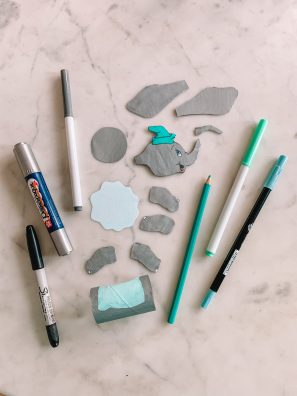
Draw and color in the following shapes on cardstock. This is PER Dumbo vehicle, and I made five vehicles. Each vehicle should feature a different pastel color, color in accordingly:
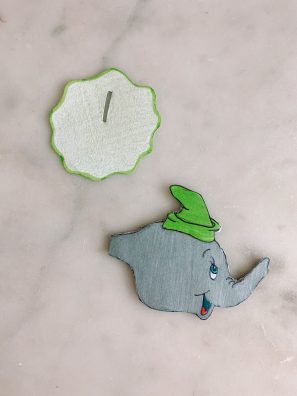
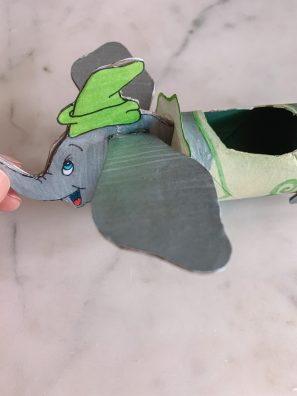
- Two Dumbo faces, mirrored from each other. Leave a “tab” extended on the back of the head for attaching to the collar later on. You can use your computer as a “Lightbox” by opening a Dumbo photo in your browser, holding up a piece of cardstock to the screen and lightly tracing the face.
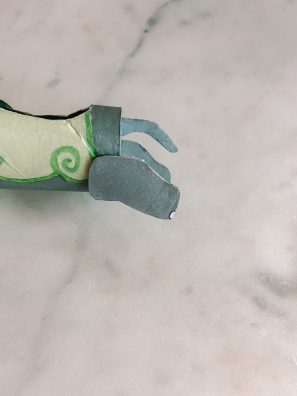
- Four leg shapes (see photo, each one will be the same shape but placed/oriented differently on Dumbo)
- Two ear shapes with (an extended “tab” at the narrow end for attaching to the face)
- One circle, the same size as your cardboard tube’s opening
- One wavy circle (to be his collar), slightly larger than your cardboard tube’s opening
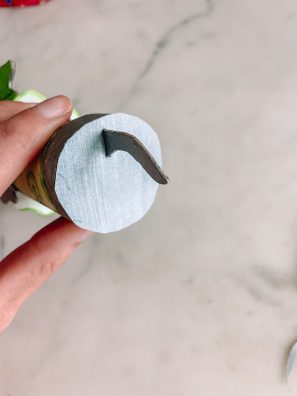
- One tail shape
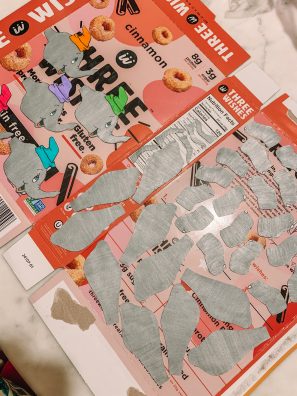
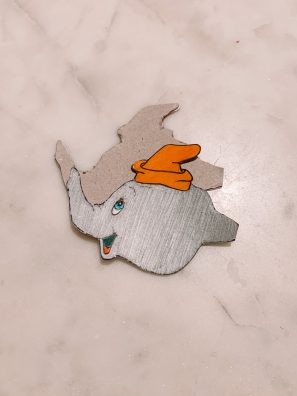
Glue (per vehicle) one Dumbo face, four legs, two ears, one circle and one tail shape to the PRINTED side of a cereal box (or other thin cardboard box). This provides stability. Cut out.
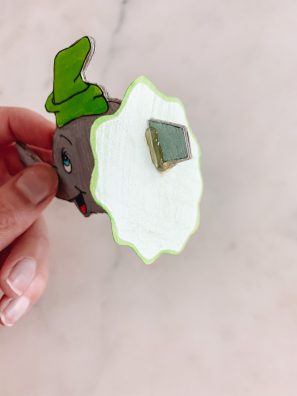
Adhere the mirrored Dumbo face to the other side of the Dumbo face that is now mounted on cardboard.
Color/paint the back side (the plain cardboard side) of the other Dumbo shapes, the same as you did the front side.
Paint/color the cardboard tube as shown, with a different color blanket on each one.
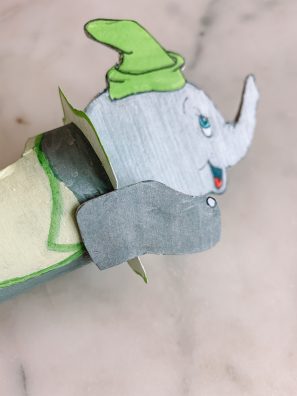
Cut a slit in the wavy collar and slip the tab on the Dumbo face through it, glue in place. Glue the collar to one end of the cardboard tube.
Glue the front legs on. You’ll have to cut into your collar shape to make room for the legs.
Bend down the tabs on each ear and glue onto each side of the Dumbo face.
Cut a slit in the circle and insert the end of the tail, glue in place. Then glue the circle to the other end of the cardboard tube.
Glue the back legs on.
Poke a hole through one side of the cardboard tube and slide it on to one of the red dowels (all the way until it hits the opposite side of the cardboard tube. Glue in place.
Repeat for each vehicle!
How To Finish Your Dumbo Ride
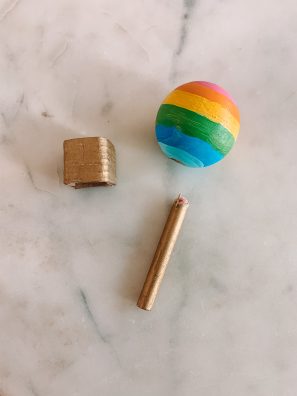
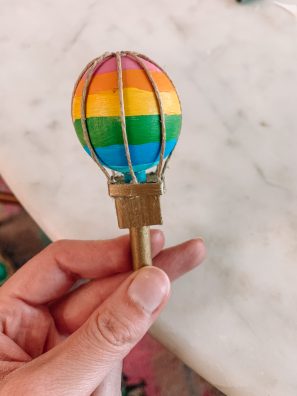
Paint your wood bead with rainbow stripes. This is your hot air balloon.
Cut a 3/4″ square out of cardboard. Add a 1/4″ wide band of cardboard around the edge. Then fold a piece of cardboard into a small cube that’s slightly smaller than the square you just created. Glue to the bottom of the square. Paint it all gold. This is your hot air balloon basket.
Paint a 2″-3″ piece of a dowel (if you cut your red ones down one of the excess pieces might work!) gold.
Poke a hole in the cardboard square and slip the dowel through it. Then glue the end of the dowel to the bottom fo the wood bead.
Cut three strands of twine long enough to wrap from the top of the basket, around the balloon and back down the other side. Glue the middle of each strand to the top of the balloon, going in different directions, and then the ends to the top of the basket.
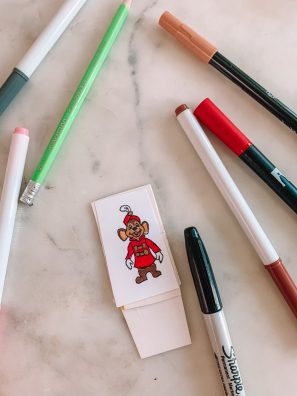
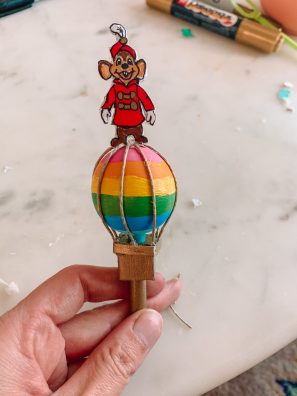
Draw/color a small Timothy mouse. Again, I suggest using your computer as a Lightbox and tracing an image you find! Glue to a scrap piece of your cereal box, and then draw/color the back on the other side. Glue him to the top of the balloon.
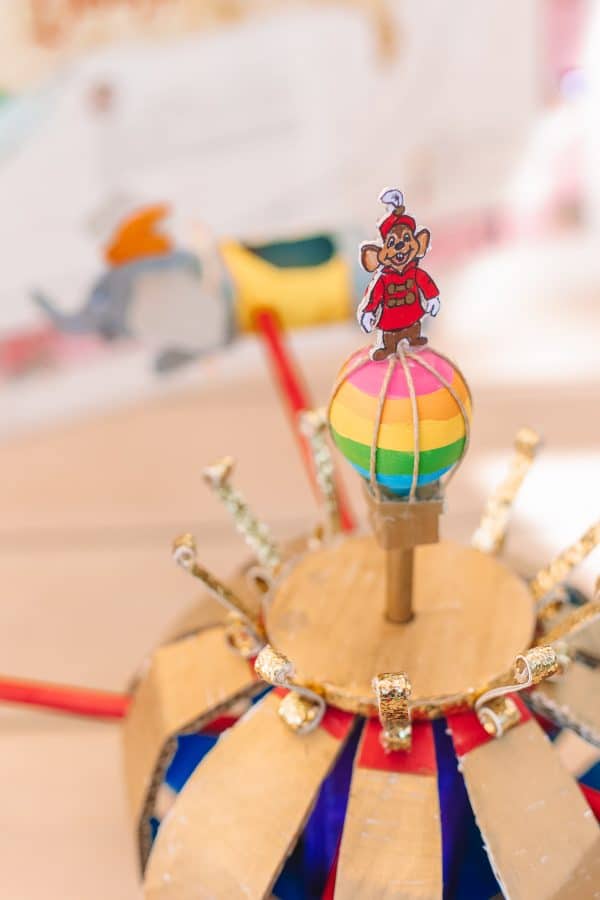
Glue the final cardboard circle you had leftover from the beginning to the top of the ride, covering the tops of all the petals that were previously glued up.
Poke a hole in the center and insert the dowel from the hot air balloon, hot glue in place.
If using, glue a narrow piece of gold glitter foam along any exposed cardboard edge as desired.
Cut narrow strips of gold glitter foam and curl them into little flourishes. (10 total) Glue each one to the top of one of the petals. (You could also make these out of cardboard or cardstock and paint them gold!)
You’re done! Watch the video below to see ours in action!
Tips for Making a Dumbo Ride
Here’s a few tips that helped me along the way:
- Use your computer as a Lightbox to help you draw the Dumbo face and Timothy mouse! Pull up a photo (or coloring page) with the image you want and hold a piece of paper up to your computer screen. Lightly trace what you see. Then go back in afterwards and clean up any lines!
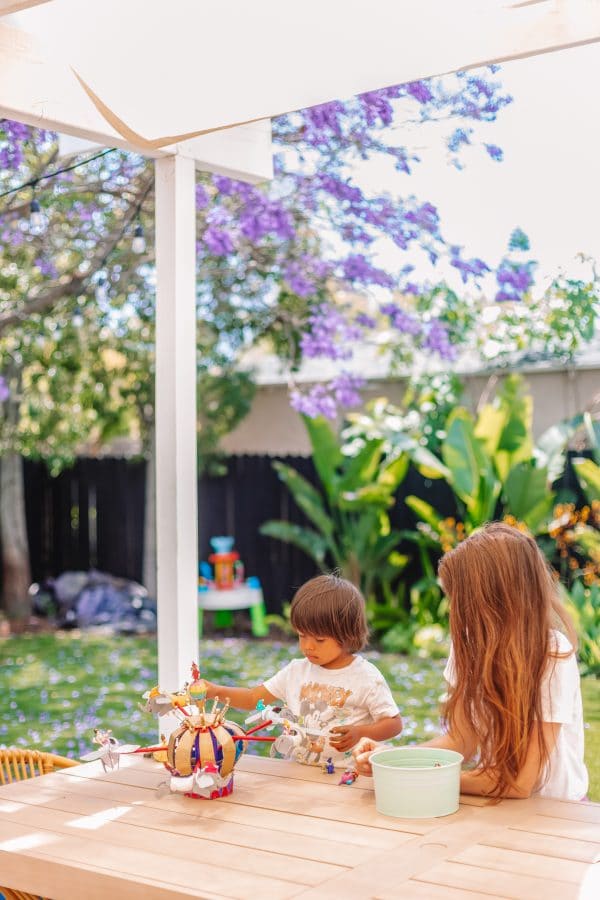
- Get your kids involved! If they are very little, just have them help paint. Lots of big chunks of blue painting to be done, and it’s great for even toddlers!
- When playing with the ride, you’ll want to make sure it’s well balanced (i.e. a toy in each car) so that it spins properly.
Photos by Jeff Mindell
Let me know what ride you’d like to see us re-create next! The tea cups are pretty high up on our list. And of course we’ll have to tackle It’s A Small World at some point! 😉
p.s. The map seen in the background here is a vintage Disneyland map. You can find them at flea markets or occasionally on Etsy or Ebay. We got ours at the Rose Bowl Flea Market!
How To Make A Cardboard Dumbo Ride
Materials
- Corrugated Cardboard (Shipping box, etc.)
- Thin Cardboard (Cereal box, etc.)
- Cardstock
- 1 Bolt
- 3 Washers
- 3 Nuts
- 6 Dowels (Mine were 3/8" wide by 12")
- 1 Wood Sphere or Bead (Mine was 1 1/2")
- Paint (Red, blue, gold, white, gray, varying pastel colors)
- Markers (Black, varying colors that are slightly brighter than their pastel versions)
- Colored Pencils (Matching pastel colors)
- Pencil
- Twine
- Hot Glue Gun
- Scissors
- Gold Glitter Foam (Optional, you could just use cardboard!)
- 5 Cardboard Tubes (Toilet Paper Rolls)
Instructions
Dumbo Ride
- Cut a cardboard circle, about 18" in diameter. Draw a smaller (approx 3" diameter) circle in the center of this larger circle. Then cut ten narrow, "petal" shaped sections into your larger circle, as shown in the photos above.
- Cut the following out of cardboard: Two 4" circles, one 3" circle, one 1 1/2" x 15" strip, one 1 1/2" x 14" strip, one 2" square, one 4 1/2" x 8" rectangle, five toilet paper rolls, with an oval cut into the top of each (set aside and save for making the Dumbo vehicles below!)
- Make the base: Poke a hole through the center of one 4" circle and the 2" square. Stack the square on top of the circle. Slip a nut and washer onto your bolt, then slide the bolt through the two cardboard pieces. Add another washer and nut to the top. Tighten the nut and then HOT GLUE it in place (otherwise the nut/bolt will come unscrewed as it spins). Glue the 15" strip along the edge of the circle. This becomes your base.
- Make the center column: Fold the 4 1/2" x 8" rectangle into a 3D column shape, lengthwise, with each long side being 2" wide. Hot glue.
- Paint: The large "flower" looking shape should be painted blue on one side (the "inside") and gold on the other (the "outside"). You'll want to add a white and red stripe to the tips of each "petal" on the gold side as well. See photos!
- Paint the outside of the base with a blue and red triangle pattern, outlined with gold. Paint the 14" strip blue and add gold stars. Paint the column blue. Paint the other 4" circle and the 3" circle gold. Paint five dowels red. Tip: I found that using paint markers was way easier on a lot of this than painting freehand, but either works!
- Poke a hole through the center of the "flower" shape. Slide onto the bolt. Add a washer and nut. Tighten, but ensure the flower can spin fully and easily around the bolt. Hot glue in place.
- Hot glue the column in the center of the flower shape, hiding the bolt inside of it. Then, hot glue the 14" blue strip around the edge of the circle in the center of the flower shape.
- Trim red dowels down if desired. I trimmed about 2" off of each dowel, but you can decide if you want to leave them longer (making the Dumbo vehicles further from the ride) or make them even shorter (so they are closer to the ride).
- Insert the dowels into the column. To do this, you're going to need to do some trial and error. You need to fit five dowels evenly spaced around the column. Additionally, each dowel needs to be placed so that it occupies a "space" in-between two petals, once they are folded up to become a sphere shape. See photos. Tips: To do this, I suggest holding up a dowel where you want to put it, and folding up the petals surrounding it to ensure it fits properly. Once you've done that, use scissors to poke a hole through the column where you want to insert the dowel. Put a large dot of hot glue on the END of the dowel and slide it through the hole until it touches the other side of the column where the glue will adhere. You'll want each dowel to be placed at a slightly different height, to give the look of the Dumbo vehicles moving at different levels.
- Fold up each petal shape and hot glue to the top of the column. They should be curved (use your fingers to help curve the cardboard) and form a sphere shape.
Dumbo Vehicles (All of the instructions below are for ONE Dumbo ride "vehicle." So multiply the quantities by the total number of vehicles you make. For my ride, I made five vehicles total.)
- Draw and color in the following shapes on cardstock. This is PER Dumbo vehicle, and I made five vehicles. Each vehicle should feature a different pastel color, color in accordingly: Two Dumbo faces, mirrored from each other. Leave a "tab" extended on the back of the head for attaching to the collar later on. (You can use your computer as a "Lightbox" by opening a Dumbo photo in your browser, holding up a piece of cardstock to the screen and lightly tracing the face.), four leg shapes (see photo, each one will be the same shape but placed/oriented differently on Dumbo), two ear shapes with (an extended "tab" at the narrow end for attaching to the face), one circle, the same size as your cardboard tube's opening, one wavy circle (to be his collar), slightly larger than your cardboard tube's opening and one tail shape.
- Glue (per vehicle) one Dumbo face, four legs, two ears, one circle and one tail shape to the PRINTED side of a cereal box (or other thin cardboard box). This provides stability. Cut out.
- Adhere the mirrored Dumbo face to the other side of the Dumbo face that is now mounted on cardboard.
- Color/paint the back side (the plain cardboard side) of the other Dumbo shapes, the same as you did the front side.
- Paint/color the cardboard tube as shown, with a different color blanket on each one.
- Cut a slit in the wavy collar and slip the tab on the Dumbo face through it, glue in place. Glue the collar to one end of the cardboard tube.
- Glue the front legs on. You'll have to cut into your collar shape to make room for the legs.
- Bend down the tabs on each ear and glue onto each side of the Dumbo face.
- Cut a slit in the circle and insert the end of the tail, glue in place. Then glue the circle to the other end of the cardboard tube.
- Glue the back legs on.
- Poke a hole through one side of the cardboard tube and slide it on to one of the red dowels (all the way until it hits the opposite side of the cardboard tube. Glue in place. Repeat for each vehicle!
Dumbo Ride Balloon Topper
- Paint your wood bead with rainbow stripes. This is your hot air balloon.
- Cut a 3/4" square out of cardboard. Add a 1/4" wide band of cardboard around the edge. Then fold a piece of cardboard into a small cube that's slightly smaller than the square you just created. Glue to the bottom of the square. Paint it all gold. This is your hot air balloon basket.
- Paint a 2"-3" piece of a dowel (if you cut your red ones down one of the excess pieces might work!) gold.
- Poke a hole in the cardboard square and slip the dowel through it. Then glue the end of the dowel to the bottom fo the wood bead.
- Cut three strands of twine long enough to wrap from the top of the basket, around the balloon and back down the other side. Glue the middle of each strand to the top of the balloon, going in different directions, and then the ends to the top of the basket.
- Draw/color a small Timothy mouse. Again, I suggest using your computer as a Lightbox and tracing an image you find! Glue to a scrap piece of your cereal box, and then draw/color the back on the other side. Glue him to the top of the balloon.
- Glue the final cardboard circle you had leftover from the beginning to the top of the ride, covering the tops of all the petals that were previously glued up.
- Poke a hole in the center and insert the dowel from the hot air balloon, hot glue in place.
- If using, glue a narrow piece of gold glitter foam along any exposed cardboard edge as desired. Cut narrow strips of gold glitter foam and curl them into little flourishes. (10 total) Glue each one to the top of one of the petals. (You could also make these out of cardboard or cardstock and paint them gold!)


Amanda says
This is so amazing!! Love seeing these tutorials 🙂
Kelly says
Thanks Amanda!!
CM says
oh my goodness!!!
these are TOO cute! the king arthur carousel would be cool, and Splash mountain!!
Kelly says
Oooh the carousel would be SO fun!!
Renske Bondrager says
I love this, thank you! I can’t wait untill my daughter is big enough to help me make this!
at home with ashley says
This is absolutely adorable! I love combining the classic look of Disney with upcycled materials
Kristy says
This is amazing! Just a quick comment, it doesn’t look like you have the cardboard tubes listed on the materials lists.
Kelly says
Whoops! Thank you for catching that, it should be updated now!
madalin stunt cars 2 says
We must demand justice for George Floyd, Breonna Taylor, Ahmaud Arbery and every other Black person who has been the victim of injustice and racism in this country.
Scarlet says
That is so adorable! It makes me feel like I am at Disney World. This Dumbo ride gives me strong feelings of nostalgia.
Amma Munro says
I am a really surprised to see such a good writer like you.
https://premiumonlineclasses.com/
Jessica says
Thanks for sharing this tutorial on making a cardboard. I like this website to know how to do it.
lolo says
Your feedback helps me a lot, A very meaningful event, I hope everything will go well run 3
arealana says
This is absolutely adorable! I love combining the classic look of Disney with upcycled materials
https://studiodiy.com/how-to-make-a-cardboard-dumbo-ride/
Colin Cowdrey says
it’s probably that the beans were left for weeks after choosing. Fresh coffee goes away fairly fast. To locate new beans, it’s ideal coffee stores, and coffee stores will roast them, https://www.zlpackindustrial.com/