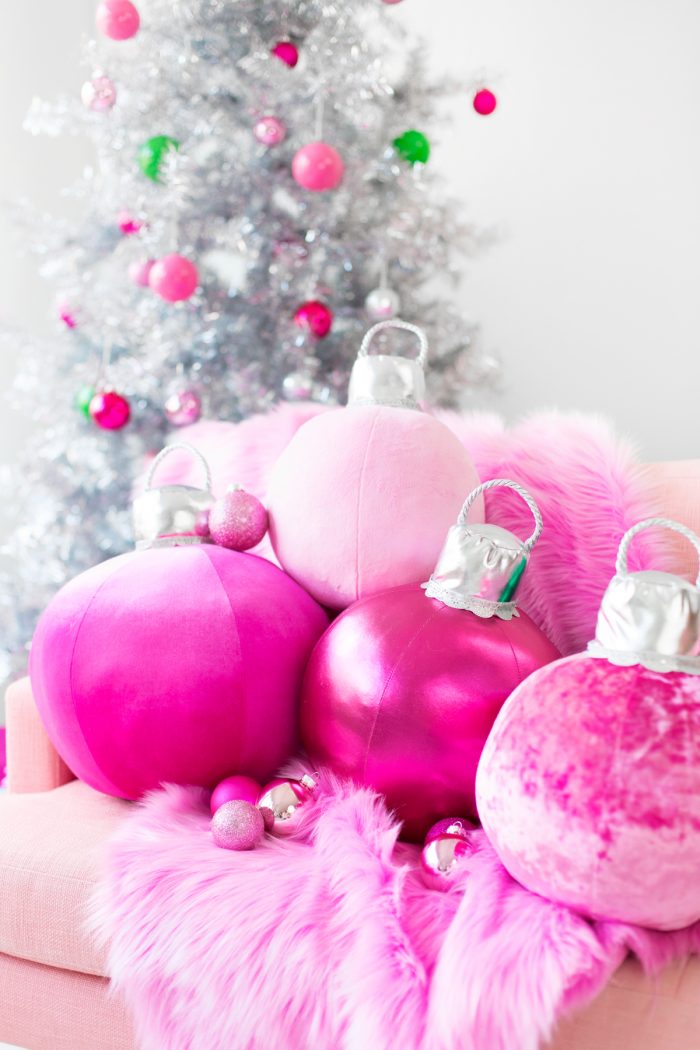
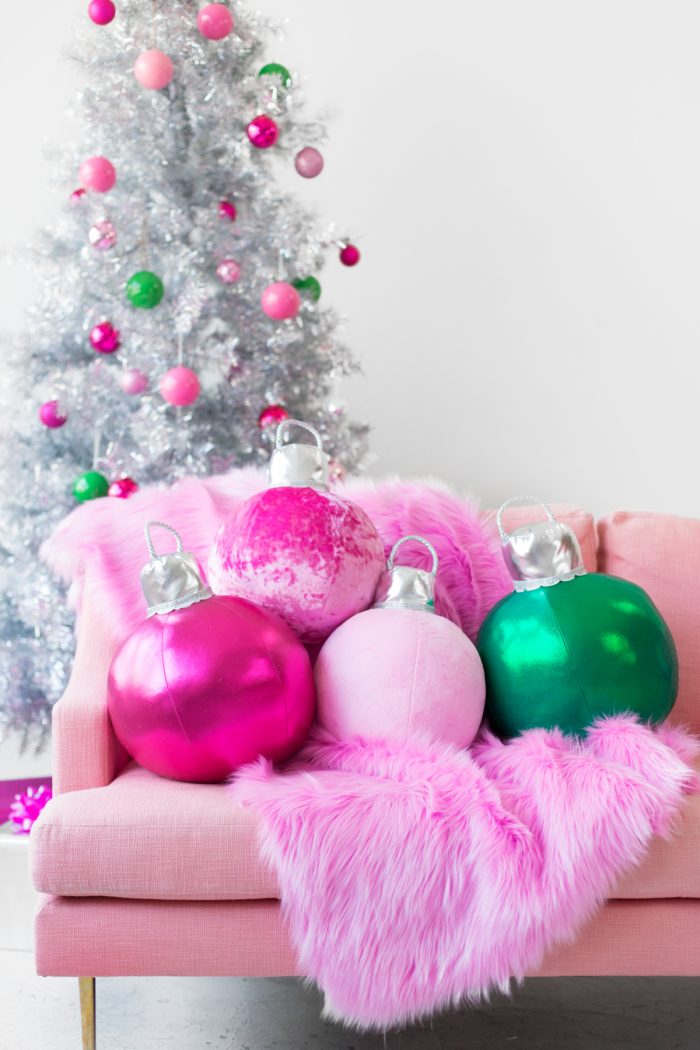
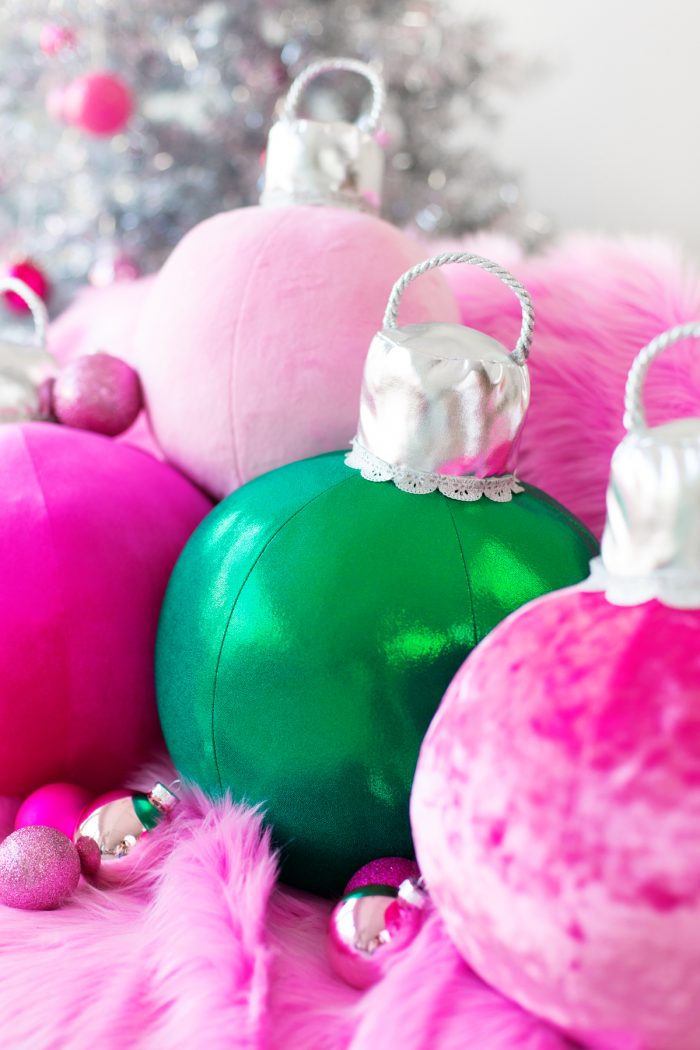
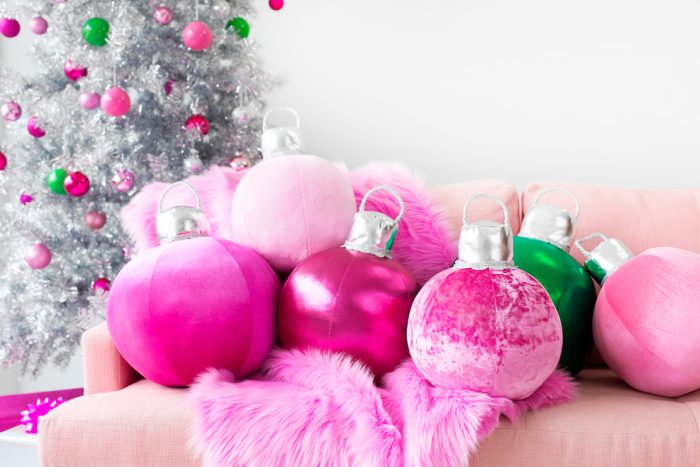
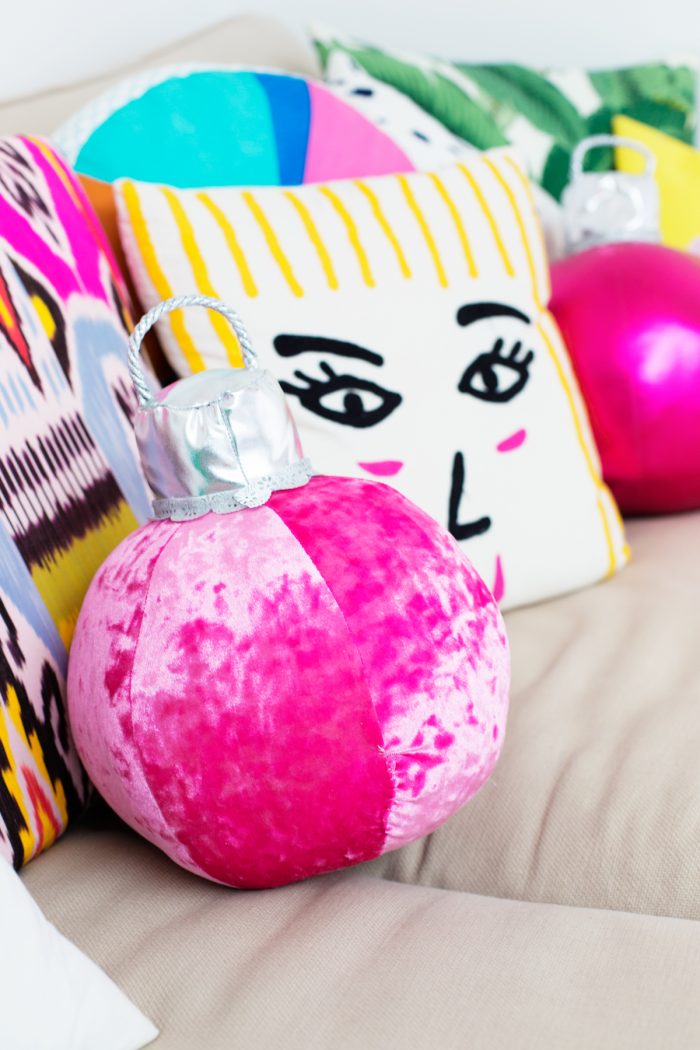
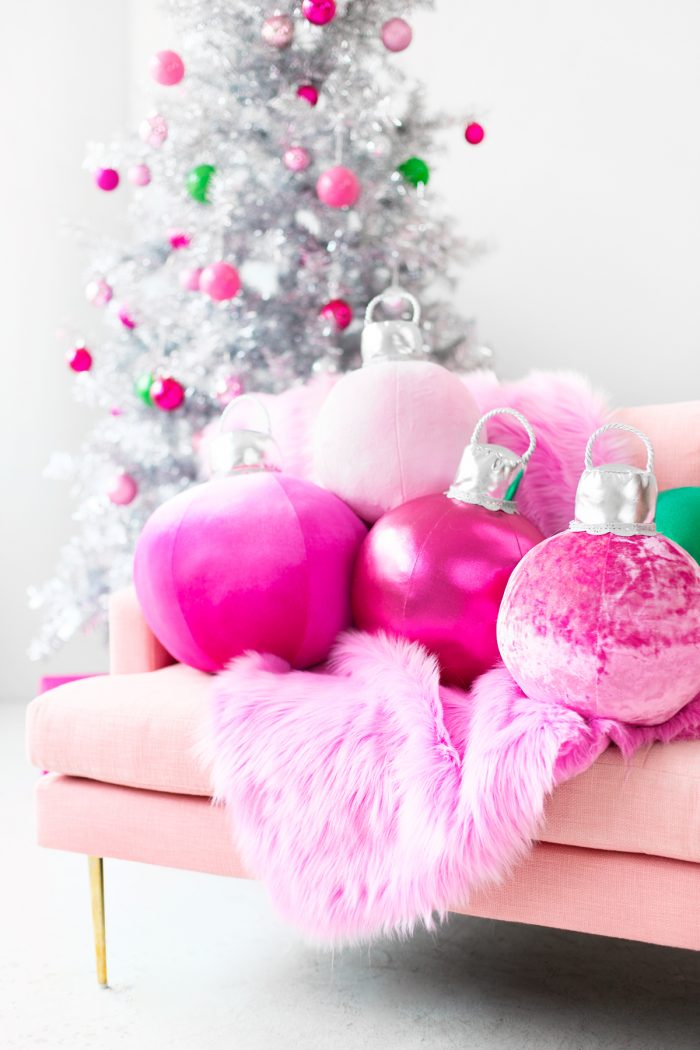
A spot in your home that could be more festive this holiday season? Your couch! Enter these DIY giant Christmas ornament pillows!
These pillows can be made with basic sewing skills, and we used a variety of materials to show you that you could really use any fabric you’d like. They’re a great Christmas craft project that will quickly turn into heirloom holiday home decor that you can pull out each season. And that makes my heart super happy!
Supplies You’ll Need
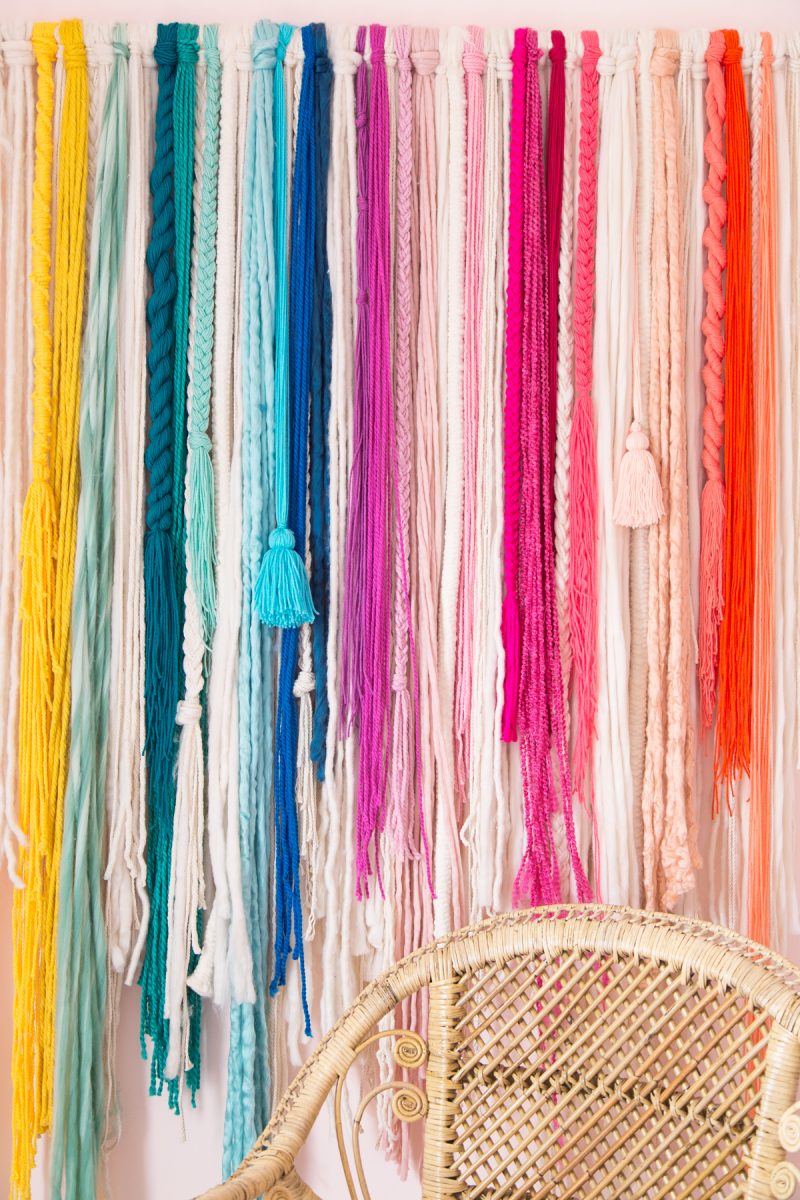
- 1/2 Yard Fabric of Choice for Ornament (We used velvet, fleece and lamé. All the fabrics had stretch to them.)
- 1/4 Yard (or less) Silver or Gold Fabric for Ornament Top (We used lamé)
- Ornament Template
- Fabric Scissors
- Pins
- Sewing Machine
- Needle + Thread
- Stuffing
- Silver or Gold Trim (Optional, to finish off the top of the ornament)
- Silver or Gold Cord
- Clear Nail Polish
- Hot Glue Gun
How To Make Ornament Pillows
1. Cut out six of the ornament sections using the pattern out of your fabric (pink in my case). Cut out one circle and one rectangle out of your metallic fabric (silver in my case).
2. With right sides together, stitch together two ornament sections along one curved side.
3. With right sides together again, stitch a third ornament section onto the other edge of the one you just sewed and stitch together.
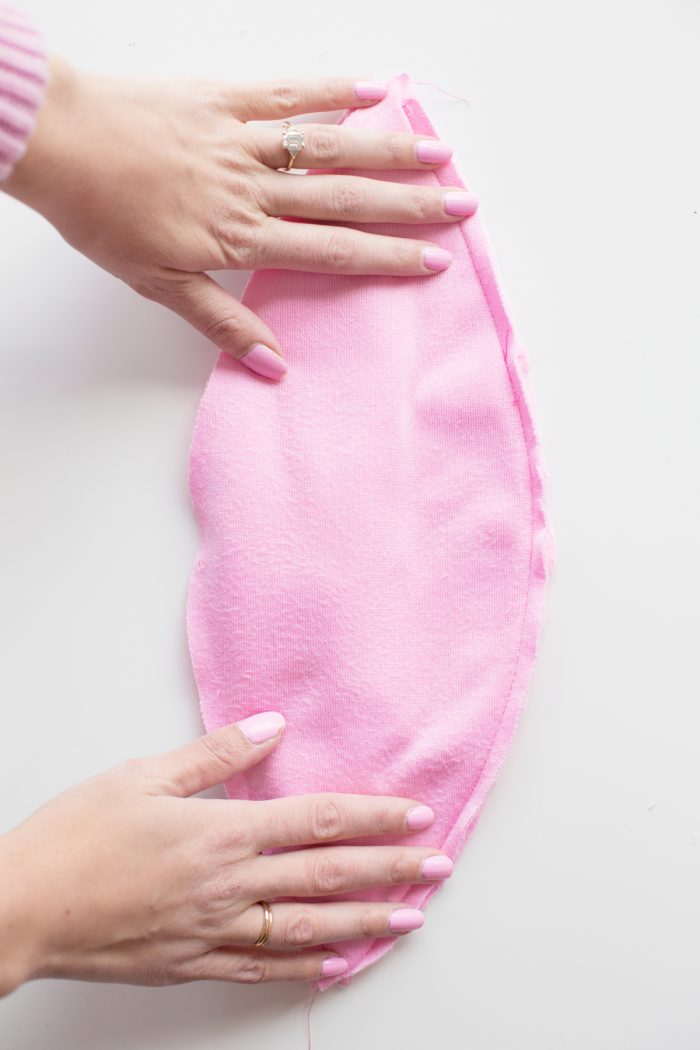
4. Repeat this, so you’ll have two pieces with three sections each.
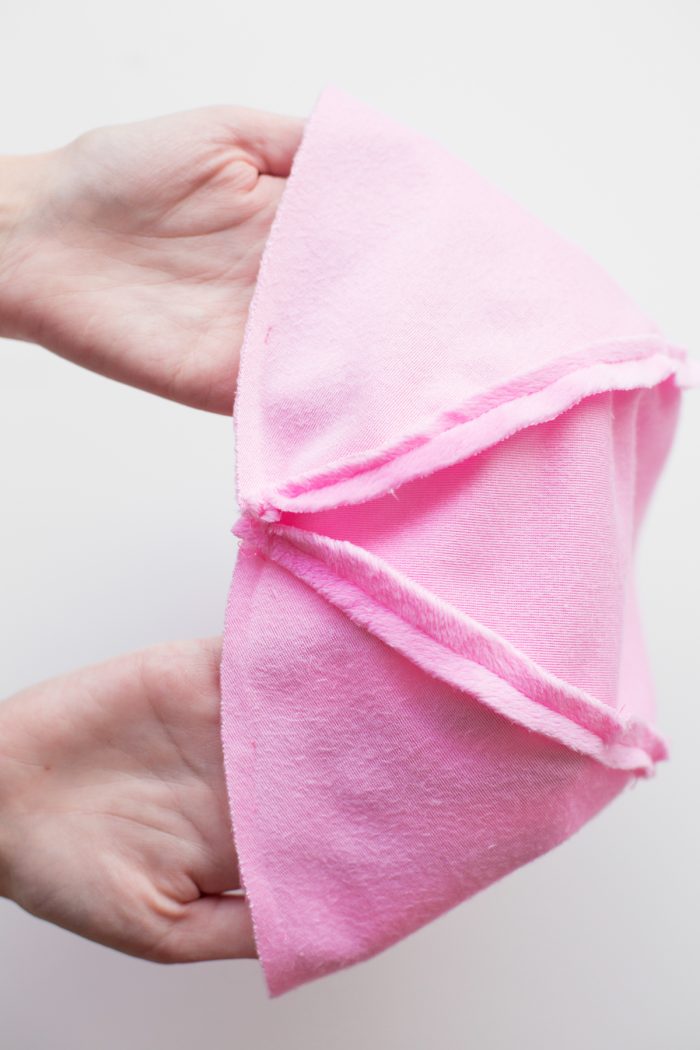
5. With right sides together, pin the two halves together. Make sure the “points” where all three pieces meet on each are matched up and pin all the way around the circle, leaving about 3-4″ open (for turning). Stitch together.
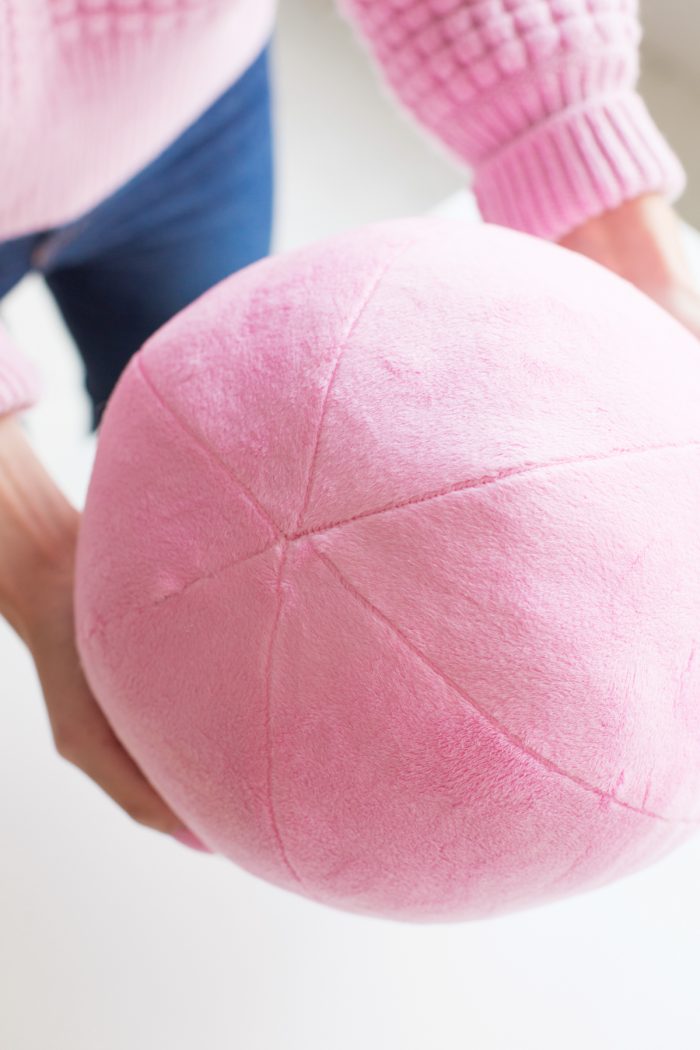
6. Turn right side out and stuff. Make sure it is super full so the ornament is nice and round.
7. Use a needle and thread to hand-stitch the opening together using a slip stitch.
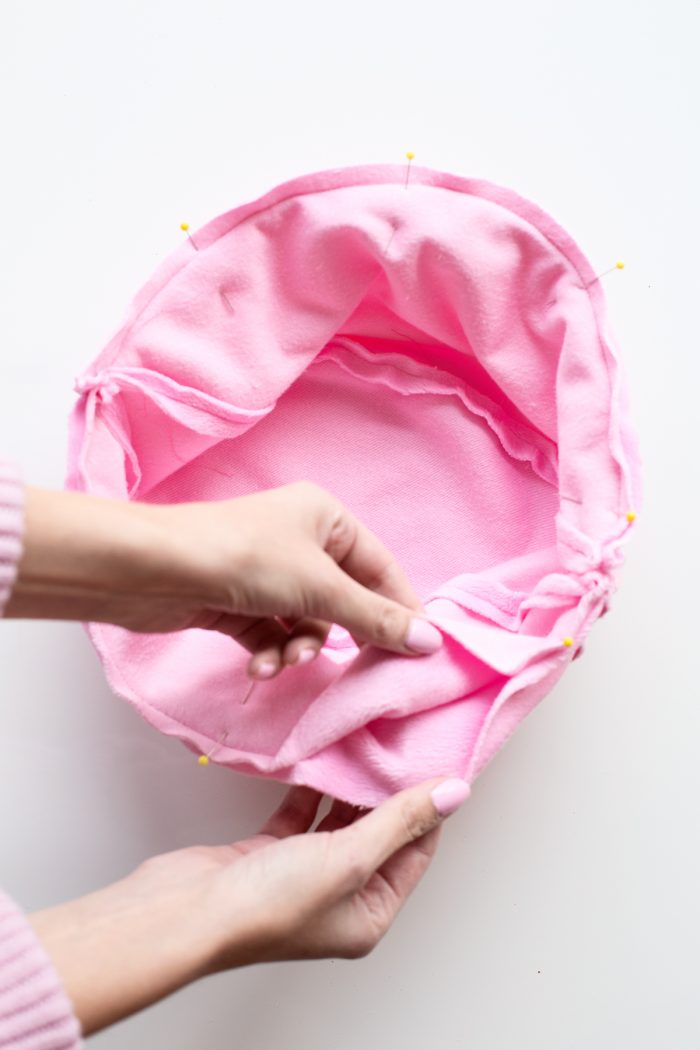
8. With right sides together, sew the two short ends of the rectangle together, forming a ring.
9. With right sides together again, pin and sew the ring around the circle.
10. Turn right side out and stuff with stuffing.
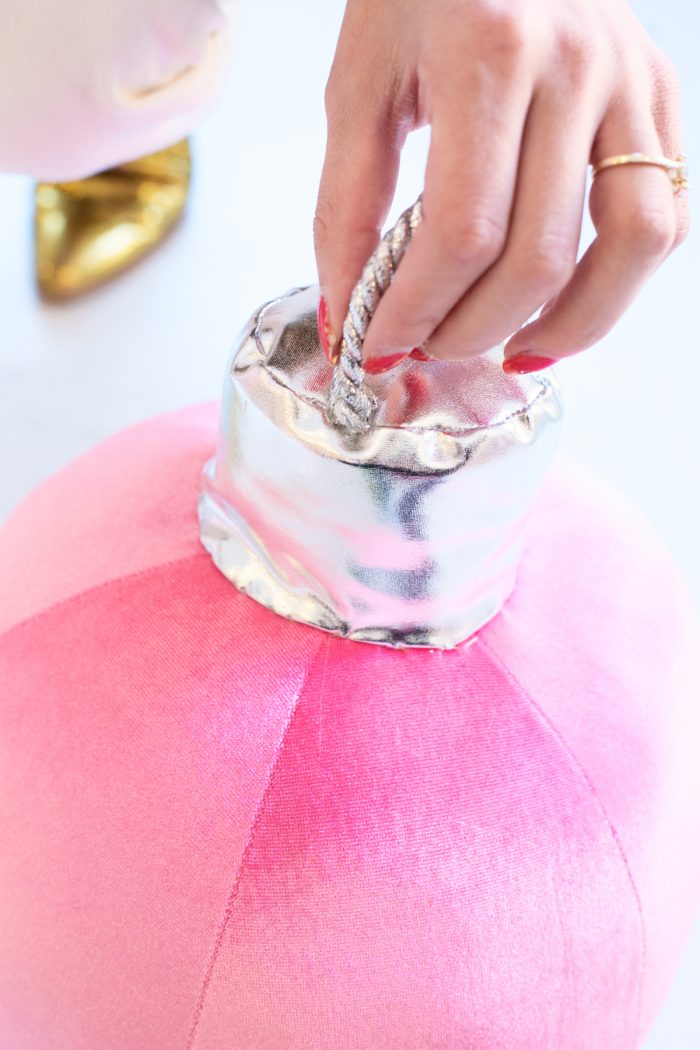
11. Pin to the top of the ornament. Hand stitch the top onto the ornament using a slip stitch.
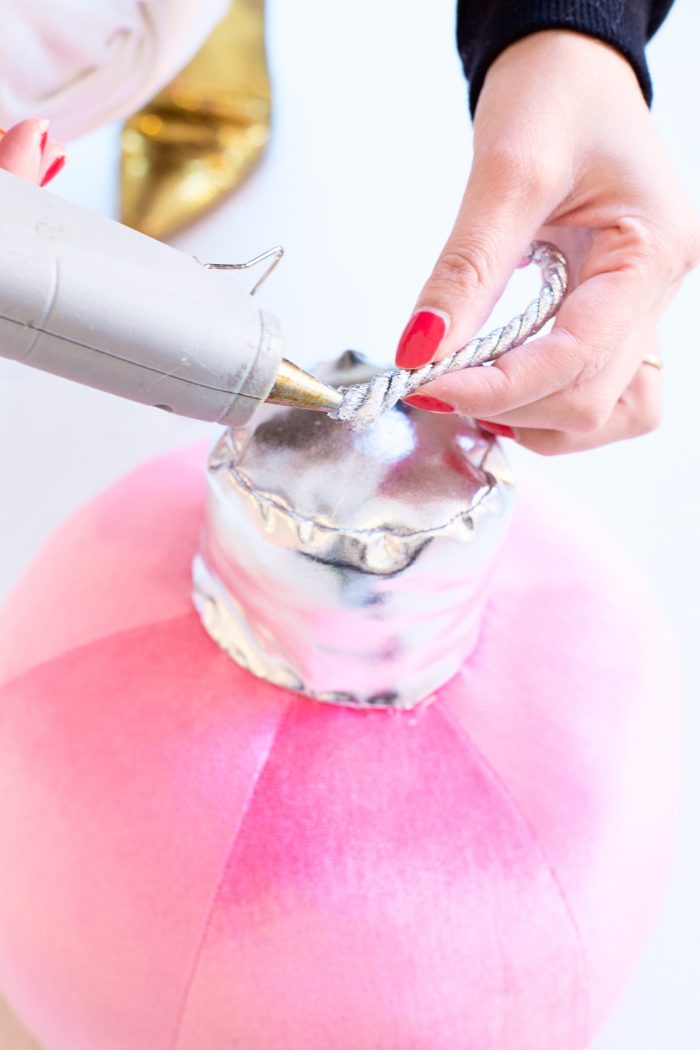
12. Cut a piece of cord about 4-5″ long. Immediately dip the ends into clear nail polish to prevent fraying. Let dry.
13. Hot glue or stitch the cord on top of the ornament topper.
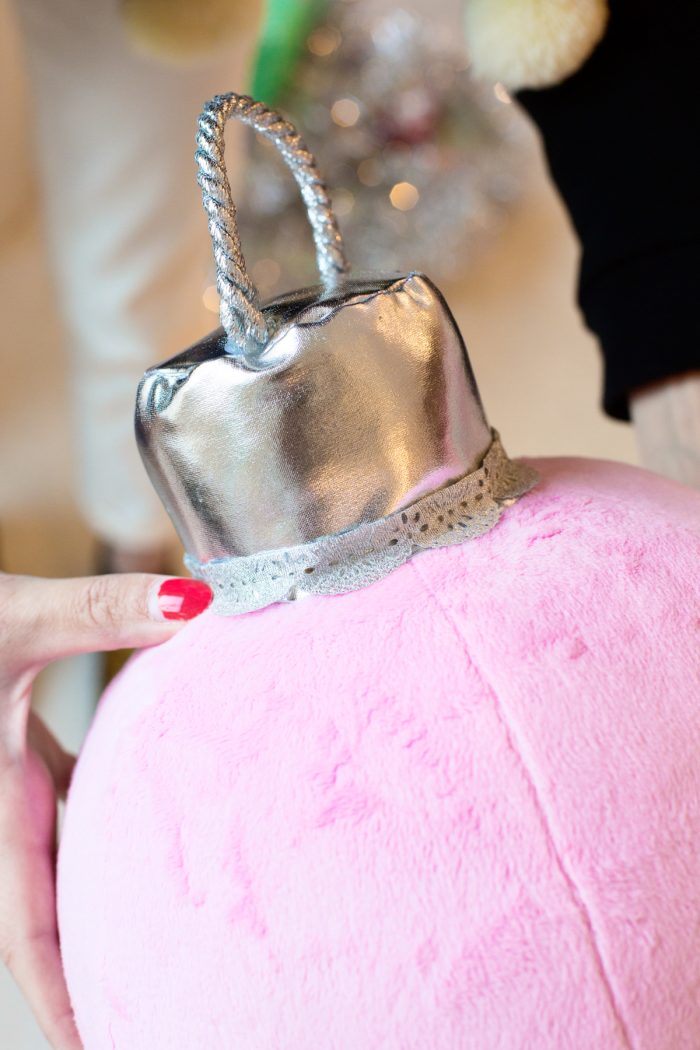
14. If finishing with trim, hot glue the trim around the base of the topper.
Where should I display my giant Christmas ornament pillows?
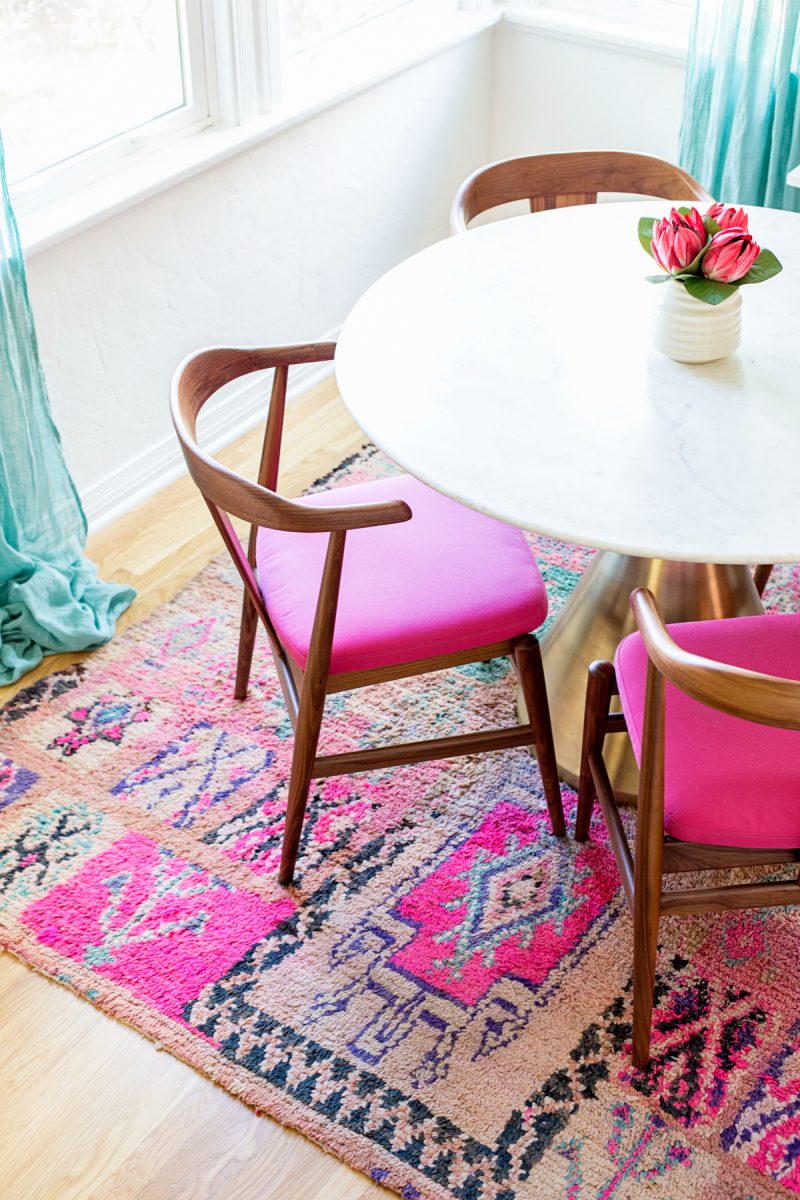
These pillows look festive tossed on your couch, on a bed in a kids room or on a guest bed to welcome guests for the holiday! Try swapping the toss pillows on an accent chair with ornament pillows for the season, too.
They also are a fun added element on the floor, in a playroom, beside a media console or anywhere you’d toss a floor pillow.

Photos by Jeff Mindell
Many years ago we made these ornament balloons and they were (and still are!) a huge hit and today we’ve got a more permanent variety, for your home!!!
p.s. Ornament donut holes!

DIY Giant Christmas Ornament Pillows
Equipment
- Sewing Machine
- Fabric Scissors
- Pins
- Needle & Thread
- Hot Glue Gun
Materials
- 1/2 yard fabric in color of choice for ornament I used velvet, fleece and lamé
- 1/4 yard silver or gold fabric for ornament topper I used lamé
- Ornament Template
- 1 bag poly Stuffing Large bag, otherwise grab two!
- 1/2 yard silver or gold trim optional
- 1/4 yard silver or gold cord
- Clear nail polish
Instructions
- Cut out six of the ornament sections using the pattern out of your fabric (pink in my case). Cut out one circle and one rectangle out of your metallic fabric (silver in my case).
- With right sides together, stitch together two ornament sections along one curved side.
- With right sides together again, stitch a third ornament section onto the other edge of the one you just sewed and stitch together.
- Repeat this, so you’ll have two pieces with three sections each.
- With right sides together, pin the two halves together. Make sure the “points” where all three pieces meet on each are matched up and pin all the way around the circle, leaving about 3-4″ open (for turning). Stitch together.
- Turn right side out and stuff. Make sure it is super full so the ornament is nice and round.
- Use a needle and thread to hand-stitch the opening together using a slip stitch.
- With right sides together, sew the two short ends of the rectangle together, forming a ring.
- With right sides together again, pin and sew the ring around the circle.
- Turn right side out and stuff with stuffing.
- Pin to the top of the ornament. Hand stitch the top onto the ornament using a slip stitch.
- Cut a piece of cord about 4-5″ long. Immediately dip the ends into clear nail polish to prevent fraying. Let dry.
- Hot glue or stitch the cord on top of the ornament topper.
- If finishing with trim, hot glue the trim around the base of the topper.
")


Élodie says
These are so cute! I love the pink and green shiny version. They all look so nice on your sofa – great colour match! 🙂
Kelly says
Thanks so much! I had a blast making these, and I’m pretty much in LOVE with them!
Chelsey says
Obsessed!!! I’m buying fabric today! Thanks for the great tutorial!
Chelsey says
Do you have the pattern link?
Kelly says
So sorry! Little bit of an issue on the back-end of the blog, will totally be up ASAP!
TEMPLATE UPDATED!
Deb says
Where are the templates for these? I love them and would like to make them 😄
Jessica says
I can’t wait to see the step shots! These are amazing x
Jessica — NinetyCo
Kelly says
Step shots coming soon!!!
Kathleen says
So this is why you were looking at such fun fabrics! GENIUS idea.
Kelly says
Thanks!
Michelle says
They are so cute, wonderful idea!
https://www.makeandmess.com/
Kelly says
Thank you!
Leigh says
Precious!!! And can we talk about the heart pockets on your jeans too? Had to pin that image b/c of the hearts! <3 haha Merry Christmas!
Kelly says
Pretty much my FAVORITE part of the jeans! 😘
Kristina B says
I cannot even deal with how cute and PERFECT these are!!! The possibilities for fabric are just ENDLESS. Bravo!!!
Kelly says
Thank you! So glad that you like them!
Julia says
I can’t wait until the pattern is up! I really need to make these for my sofa… just really. They are perfection!
Julia – http://bunnybaubles.com
Chelsey G says
I cannot WAIT to make these!!! They are seriously FANTASTIC. xoxo
Kelly says
YAY! So glad you like them! Share them on Instagram with #troopstudiodiy when you finish so I can see!!!
TEMPLATE UPDATED!
Coast2Coast says
Oh my gosh! These are soooo cute – Definitely making these when I have free time <3
Kelly says
You totally should! 😍😍
Antonella | White House Crafts says
I am so in love!
Jalee says
Oh em geeee, they’re all PERFECT!
Joyce says
Went crazy when I saw these. Definitely going to drop everything else and sew! Thanks.
moderndaygf says
Can we talk about how cute this is def sharing this on my socials! Thank you for sharing! www.themoderndaygirlfriend.com
Regina says
Holy Hannah! These are absolutely adorable!!! LOOOVE.
Natalie says
How cute!! And where is your sofa from? I’ve been on a hunt for the perfect blush sofa. 😉
sammie says
Oh wouw! These are so cool! Love them!
Stephani says
Can you sell them please for people like me who love to decorate with adorable DIY items, but can’t make anything
Heather says
Omg.. Can i tell you I’m dying right now and WHY didn’t i find these earlier!! LOL…. ABSOLUTELY LOVE THESE.. And, girl, pink is my world!
Olivia says
Oh-my-God! I simply love them! I can’t find the right words to say how much joy this post has brought me. Happy holidays, Kelly!
Sandy says
how important is it for the fabric to have stretch? The lame I have in my stash does not stretch, so I may use some satin I have, it has a little stretch. Also, did you enlarge the pattern, if so, by how much? I’m going to try making a couple for last minute Christmas gifts.
Thank You! These are so adorable, my DIL’s will LOVE them!
Kelly says
Hi Sandy! You can totally use fabric that doesn’t have stretch, I don’t see a problem with that at all! And I did not enlarge the pattern, though you certainly could if you wanted to. There is a “large” and “small” size in there for you to use. Let me know how it turns out!!
cat says
where did you get the pink couch
Camille says
Love love love. Wish I would of saw this before but still thinking I should make at least one. Quick question , is that a rug or a blanket on your couch. Super cute. Thanks for the adorable DIY
Kim says
Do you sell on etsy?
deborah depiano says
the PILLOWS ARE SO FAB YOU MUST SELL THEM NEXT SEASONS…..COULD NOT BE ANY BETTER…OXOXOXOXO
Lillian Puritz says
Please can you let me know how to get the pattern for the xmas pillows ? Can I buy it? Please let me know.
Thank you ,
Lillian
Kelly says
It’s linked in the supply list above!
Linda says
Would love the template. Where can I find them?
Kelly says
It’s linked in the supply list within the post! You can download it from there!
Camille says
Is that a throw or a rug on the couch. It’s very pretty
Cindy says
When I saw these I got happy at the thought of how cool these would be. I also thoughthow cool they’d be as a pillow fight, if the cord was secured right. Then I thought— How Would I ever store them!?!? Ding…. light bulb moment….
Adjust the finished size to fit a blow up beach ball in. Sure I’d have to do a simple invisible zipper zip closure at the top so it’s be fun to “bop” with. Only having to stuff the top thing with batting or plastic bags when they weren’t stored leaving a slot hidden under the hanging round thing.
Thanks for the overall idea
Asa kid I used to hate not having a green tree
Who knew how popular the aluminum trees were
Now it’s kind of pop culture to have one and quite expensive now.
Danielle says
The link for pattern in the link does not conn3ct. Can you send it to me please.
Thank you.
Joe Reid says
So the directions are great,but having the actual pattern would be more helpful to people.
CAROLYN MILLER says
How much stuffing do you use per pillow? I really want to make these but defiently don’t want to run out of supplies in the middle of it. Thanks in advance!
Cindy says
Could you give some advice please. I made one of these pillows but i am having trouble stuffing it to make it look like a ball. Any tips?
KendinYapAtölyesi says
I love those! Definitely I’ll do it!
Daisy says
These are going to be my first sewing project! I’m already excited to get started, and at least I know I’ll be done by Christmas 🙂 What kind of cord did you use? I don’t know what would be stiff enough to stay upright.
Noodle says
A bit late to this party, but think how early I will be for next christmas!
I’m a novice sewer, so not sure which is correct… Do I add an additional seam allowance around the template when I cut it out, or rather just sew a centimeter inside the cut edge?
Estefania Tapia says
Excelent idea, thaks
Tara Germany says
Are you willing to make for purchase?
Kristin says
I’ve made these and get so many compliments! Thanks for sharing this fun project.
Lynne says
These are so cool, have made 5 in crushed velvet in 2 days ❤️
Thank you
Nancy Campbell says
I love love your ideas
Madi says
Hi!
I love these! Can I please have the pattern?🙏
Kelly says
The pattern is linked in the supply list!
Megan says
Do you have a video how to?!?
Carla says
Son muy hermosos, muchas gracias por compartir este diy tan espectacular! :*
Robyn says
For a sturdier and more finished look, here is an amendment to replace Steps 9 through 13.
9. With right sides together again, pin the ring around the circle.
10. Cut a piece of cord about 4-5″ long. Remove one of your pins, and insert the cord between the fabric ring and the fabric circle, leaving about 1/2” at the top. Remove another pin directly across the circle, and pull the other end of the cord up through this opening, leaving about 1/2” poking out at the top.
11. Sew around the fabric ring and circle, backstitching once or twice over the area where the ends of the cord are sticking out.
12. Turn right side out and fill with stuffing. * The cord will have formed a secure loop across the ornament topper.
13. Pin the stuffed topper to the top of the ornament and hand stitch onto the ornament using a slip stitch.
Caroline says
Hi. Thanks for the lovely pattern they look lovely. When I’ve tried to make them they look more like a pumpkin than a nice round ball, what am I doing wrong?
Mary Pat Higley says
Awesome
Paula says
I’m more of an video student…I like to see it in action just in case I’m doing it wrong. I absolutley love them and would love to make them.
Kelly says
Thank you for the feedback, so glad you love the pillows! We’ll certainly look into adding a video tutorial in the future!